
Installing the Command-and-Control (C3) Server
Summary
The Command-and-Control Console (C3) server is the heart of SSHepherd®. Both Agents and Control Clients connect to the C3 server. And the C3 server, like an old telephone operator, facilitates connecting the Control Client’s socket to the Agent’s socket.
The SSHepherd® C3 Server is a NGINX Ingress Controller with role-based access control (RBAC) and a Mongo DB. This server acts as a Bastion/Proxy hybrid to manage ingress/egress, routing, and session requests. It also stores the historical and live streaming session recordings and provides remote session monitoring and termination capabilities.
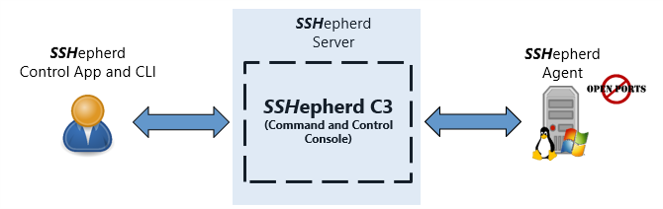
The C3 is built to be deployed into a Kubernetes (k8s) cluster to enable rapid scaling/descaling that may be required. The C3 is comprised of the following parts inside the k8s system:
- WebUI/API container(s)
- WebUI Host – hosts the Administrator Console
- Socket Routing – actual routing of data between sockets
- RTMP Container(s)
- This container is used to record, save and playback the RDP sessions
- Persistent Volume Store
- Used to store recordings
- NGINX Ingress Container(s)
- Handles the routing of traffic to the specific containers
- MongoDB database container(s)
- Used to store data about users, agents, and recordings
IMPORTANT: It is possible to move the MongoDB database/cluster out of k8s and instead, use either a stand-alone or managed/hosted version of MongoDB. To do this, you won’t be able to use either of the quick deployment scripts (as they assume you want a new MongoDB replica set inside the k8s cluster).
Before You Start
The C3 server can be installed into just about any k8s deployment. Below we will cover 2 more specific examples, Microsoft Azure AKS and MicroK8s. However, the C3 server has also been successfully deployed to Amazon EKS, K3s by Rancher, and many others.
IMPORTANT: if you are deploying to k8s other than Microsoft Azure AKS or MicroK8s, it may require more knowledge of k8s than what this guide will cover.
Full Armor will provide:
- SSHepherd® license
- Container Registry Credentials (for installing the C3 Server)
- Repository and Repository Credentials (for installing Linux shepctl and shepagent)
- Link to download:
- Windows Control App/shepctl and shepagent install package
- MacOS Control App/shepctl install package
If you have not received the items above, contact your sales rep for assistance.
You will also need the following:
- SSL Certificate. You will need PEM versions of your SSL certificate and SSL key. If you have a pfx and/or pkcs12 certificate file, see either the README-aks or README-microk8s file to see how to convert them to the proper format. Please see the Creating the SSL Certificate and Certificate Requirements article for help creating a certificate and/or to verify your certificate file meets the requirements for the C3 server installation.
- DNS entry for the host name you intend to use for your cluster (e.g., sshepherd.fullarmor.com)
- By default, automatic updates will be applied to your C3 server. If you would like to manage this manually, please see Upgrading SSHepherd® C3 Server before you begin installation.
- If you intend to utilize the Bulk User Creation feature, you will need to enable user requested password resets (forgot password feature). There are two ways to enable this:
- Using SendGrid
- Using a standard SMTP Server
See the Enabling Password Reset Feature for more information.
Installing on MicroK8s
MicroK8s is a lightweight Kubernetes package that comes with installers for every major operating system. The easiest way to install it is via the snaps plugin on an Ubuntu system and/or any other Linux system that supports snaps (https://microk8s.io/docs/getting-started). It can also be installed on many other systems as well (https://microk8s.io/docs/install-alternatives).
Some things you’ll need before you start:
- A Linux based host (or WSL2 in Windows) for configuring your cluster via kubectl
- Credentials to the SSHepherd® container registry (contact your sales rep if you have not received these)
Included with the SSHepherd® C3 .tar file (shepserver-install-<version>.tar) are some helper scripts and a quick readme. These will allow you to quickly deploy the C3 server with default options. Those included files are:
- README-microk8s
- Simple readme file on how to use the shepserver-microk8s.sh file
- shepserver-microk8s.sh
- Script that will install a standard install of all of the C3 components
- Must be run on the machine that MicroK8s is installed on
- pvc-microk8s.yaml
- Yaml file to define the needed persistent volume claim
- sshepherd.yaml
- Yaml file that defines all of the k8s components that should be deployed
- microk8s-ingress.yaml
- Yaml file that defines in microk8s how to configure the ingress
- microk8s-ingress-patch.yaml
- Patch to the nginx ingress in sshepherd.yaml
Using the script and the Let’s Encrypt service to auto-generate your certificates
Requirements when using the Let’s Encrypt service to auto-generate your certificates:
- Your C3 server must have a public IP address. This is required to complete the HTTP challenges of Let’s Encrypt.
- DNS configured for your hostname that resolves to your public IP address, e.g. my-C3-server.example.com.
- Port 80 and 443 must be publicly accessible for the Let’s Encrypt service to auto-generate your certificates.
- If firewall is enabled on your Microk8s system, open ports – 80, 443, 1935 (TCP)
- Copy the file to your system
- shepserver-install-<version>.tar
- Untar the file
tar -xf shepserver-install-<version>.tar
- Change to the shepserver-install-<version> directory
cd shepserver-install-<version>
If you already have curl installed, you can skip this step.
- Install curl
sudo apt install curl
If you already have microk8s installed, skip to Step 8.
- Install microk8s
sudo snap install microk8s --classic
- Now you are ready to run the install script. You will be prompted for the information needed for the installation script.
sudo ./shepserver-microk8s.sh
Alternatively, you can run the install script and include the required information in the format below.
sudo ./shepserver-microk8s.sh <hostname> <registry host> <registry user> <registry password> letsencrypt <your email>
Example: ./shepserver-microk8s.sh docs.fasshep.us sshepdev.azurecr.io sshepdev FB10B8XrbuUU=85lk73zvG9T8en/Itt/+ letsencrypt shepadmin@widgetco.com
- Next, you will be prompted to create the initial administrator account. Enter the email address you want to use for the Administrator account and create the password.
- Congratulations, your SSHepherd® Command and Control (C3) Server is now up and running. You should see the URL for your SSHepherd C3 server when you complete the install script and can now login to the Admin Console using the administrator account you just created.
Using the script and your own SSL Certificate
- If firewall is enabled on your Microk8s system, open ports – 443, 1935 (TCP)
- Copy the files to your system
- shepserver-install-<version>.tar
- your .key and .crt files (Contact your sales rep if you need assistance)
If using PFX certificate, convert to .crt and .key:openssl pkcs12 -in my-cert.pfx -clcerts -nokeys -out my-cert.crtopenssl pkcs12 -in my-cert.pfx -nocerts -out my-cert.key
Get unencrypted key:openssl rsa -in my-cert.key -out my-cert-unencrypted.key
- Untar the file
tar -xf shepserver-install-<version>.tar
- Change to the shepserver-install-<version> directory
cd shepserver-install-<version>
If you already have curl installed, you may skip this step.
- Install curl
sudo apt install curl
If you already have microk8s installed, skip this step.
- Install microk8s
sudo snap install microk8s --classic
- Now you are ready to run the install script. You will be prompted for the information needed for the installation script.
sudo ./shepserver-microk8s.sh
Alternatively, you can run the install script and include the required information in the format below.
sudo ./shepserver-microk8s.sh <hostname> <registry host> <registry user> <registry password> cert <crt file> <unencrypted key file>
Example: ./shepserver-microk8s.sh docs.fasshep.us sshepdev.azurecr.io sshepdev FB10B8XrbuUU=85lk73zvG9T8en/Itt/+ cert docs-fasshep-us.crt docs-fasshep-us.key
- Next, you will be prompted to create the initial administrator account. Enter the email address you want to use for the Administrator account and create the password.
- Congratulations, your SSHepherd® Command and Control (C3) Server is now up and running. You should see the URL for your SSHepherd C3 server when you complete the install script and can now login to the Admin Console using the administrator account you just created.
IMPORTANT: If your certificate does not match the hostname, or it’s not trusted by your endpoints, you can add –ignore-ssl-errors to the shepagent and shepctl commands. The –ignore-ssl-errors option should only be used in evaluation and test environments. Do not use this option in production.
Installing on Azure AKS
Azure AKS is Microsoft Azure’s managed k8s solution. Some things you’ll need before you can start:
- A Linux based host (or WSL2 in Windows) for configuring your cluster via kubectl
- Credentials to the SSHepherd® container registry
- Helm installed (this will be used to deploy MongoDB and ingress-nginx)
- If on Ubuntu, you can run:
sudo snap install helm --classic
If you are using the shepserver-aks.sh script to do your install, the script will create a brand-new Azure AKS cluster for you with everything you need. However, if you are going to do the deployment yourself, or you want to use an existing cluster you will need the following as well:
- A working Azure AKS cluster for hosting the SSHepherd® Server (at least 3 nodes)
- If you don’t have one already, you can go here to install the Azure CLI https://docs.microsoft.com/en-us/cli/azure/install-azure-cli
- And then work your way through to the end of “Connect to the cluster” here https://docs.microsoft.com/en-us/azure/aks/kubernetes-walkthrough
- NOTE – Make sure to increase your node count to at least 3 when you create the cluster
- A working kubectl configuration connected to the Azure AKS cluster
- If you followed the links above, you should be good to go
Included with the SSHepherd® C3 documentation are a few helper scripts and a quick readme. These allow customers to quickly deploy the C3 server with default options. Those include files are:
- README-aks
- Simple readme file on how to use the shepserver-aks.sh file
- shepserver-aks.sh
- Script that will install a standard install of all of the C3 components
- Designed to be run from either Linux or WSL2 (Windows Subsystem for Linux)
- pvc-aks.yaml
- Yaml file to define the needed persistent volume claim
- sshepherd.yaml
- Yaml file that defines all of the k8s components that should be deployed
- nginx-ingress-controller-patch.yaml
- Patch to the nginx ingress in sshepherd.yaml
- nginx-ingress-svc-controller-patch.yaml
- Another patch to the nginx ingress in sshepherd.yaml
Using the Script
- Login to your Azure Cloud Storage account
- Upload the shepserver-install-<version>.tar file and your .key and .crt files
- In the Azure portal, launch a Bash session
- Untar the shepserver-install-<version>.tar file
- You should see the following files on your Linux host:
- shepserver-aks.sh
- pvc-aks.yaml
- sshepherd.yaml
- nginx-ingress-controller-patch.yaml
- nginx-ingress-svc-controller-patch.yaml
- your ssl certificate
- your ssl key
- From there you can run the following command:
Using Let’s Encrypt:
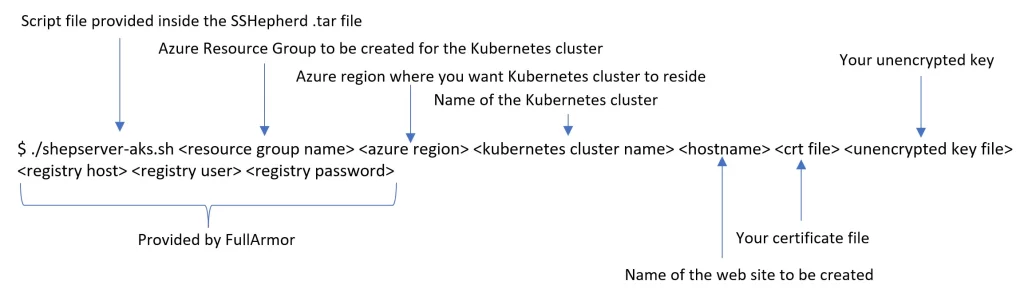
$ ./shepserver-aks.sh <resource group name> <azure region> <kubernetes cluster name> <hostname> <registry host> <registry user> <registry password> letsencrypt <email address>
Using your own certificates:
$ ./shepserver-aks.sh <resource group name> <azure region> <kubernetes cluster name> <hostname> <registry host> <registry user> <registry password> cert <crt file> <unencrypted key file>
- The install script could take up to 5 minutes to complete. At the end of the script, you should get an output similar to:
$ Cluster IP: 112.11.88.129
- Update your DNS with the cluster IP address of your AKS system. Ensure that a DNS entry exists pointing <hostname> to the AKS host. The Administrator Console will not load unless a hostname is used in the URL. https://<hostname>
- Wait for DNS to propagate, then Verify connectivity
Do-It-Yourself
- Create a namespace in AKS for SSHepherd®
kubectl create namespace sshepherd
- Configure Helm
helm repo add fa-ingress-nginx https://kubernetes.github.io/ingress-nginx helm repo add fa-bitnami https://charts.bitnami.com/bitnami helm repo update
- Install Nginx Ingress
helm install ingress-nginx fa-ingress-nginx/ingress-nginx -n sshepherd --set controller.replicaCount=3 --set controller.ingressClassResource.default=true
IMPORTANT: If you are going to use an existing MongoDB replicaset or a managed/hosted one, skip the next two steps and continue at Step 6.
- Install MongoDB
helm install mongodb fa-bitnami/mongodb -n sshepherd --set architecture=replicaset --set replicaCount=3
- Grab your MongoDB credentials
mongoPassword=$(kubectl get secret --namespace sshepherd mongodb -o jsonpath="{.data.mongodb-root-password}" | base64 --decode)
- Create a secret the API service will use to connect to MongoDB
IMPORTANT: If you are using you are using a different MongoDB than the one deployed above, change the connection string below with the correct one.
kubectl -n sshepherd create secret generic mongodb-url --from-literal=SECRET_MONGODB_URL="mongodb://root:$mongoPassword@mongodb-0.mongodb-headless.sshepherd.svc.cluster.local:27017,mongodb-1.mongodb-headless.sshepherd.svc.cluster.local:27017,mongodb-2.mongodb-headless.sshepherd.svc.cluster.local:27017/sshepherd?authSource=admin&replicaSet=rs0"
- Create your TLS secret for ingress
NOTE: Replace my.key and my.crt in the command below with the file names of your SSL certificate
kubectl -n sshepherd create secret tls aks-ingress-tls --key my.key --cert my.crt
- Create secret to access container registry
NOTE: Replace ‘$registry’, ‘$username’ and ‘$password’ with the registry, username and password you were provided.
kubectl -n sshepherd create secret docker-registry sshepherd-acr --docker-server="$registry" --docker-username="$username" --docker-password="$password"
- Create a couple more secrets for the cluster
There is a cluster secret and a password salt that needs to be generated for use inside of the k8s cluster. Running the following will create a random value for both.
clusterSecret=$(openssl rand -hex 64)
passwordSalt=""

for i in {0..40}; do
passwordSalt=$passwordSalt$(shuf -i 1-9 -n 1 | sed -r 's/\s+//g')
done

kubectl -n sshepherd create secret generic cluster-secret --from-literal=SECRET_CLUSTER_SECRET="$clusterSecret"
kubectl -n sshepherd create secret generic password-salt --from-literal=SECRET_PASSWORD_SALT="$passwordSalt"
- Wait for MongoDB
Ensure that the MongoDB cluster is all the way up before continuing. There should be 4 pods for MongoDB and they must be running – mongodb-0, mongodb-1, mongodb-2, mongodb-arbiter-0. It could take 3-5 minutes for them to get all the way up.
IMPORTANT: you can skip this step if you are using MongoDB outside of the k8s cluster.
kubectl -n sshepherd get pods
- Wait for nginx ingress
- Ensure that the nginx ingress deployment has completed as well.
kubectl -n sshepherd rollout status deployment/ingress-nginx-controller
- Update sshepherd.yaml
sshepherd.yaml needs to be updated with the proper registry and cluster hostname. Replace ‘$registry’ with the registry you were provided. Replace ‘$hostname’ with the FQDN of the hostname you plan to use (i.e., sshepherd.fullarmor.com)
sed -i "s/hostname-here/$hostname/g" sshepherd.yaml
sed -i "s/registry-here/$registry/g" sshepherd.yaml
- Deploy the SSHepherd® Server
kubectl -n sshepherd -f pvc-aks.yaml apply
kubectl -n sshepherd -f sshepherd.yaml apply
kubectl -n sshepherd patch deployment ingress-nginx-controller --patch "$(cat nginx-ingress-controller-patch.yaml)"
kubectl -n sshepherd patch service ingress-nginx-controller --patch "$(cat nginx-ingress-svc-controller-patch.yaml)
- Wait for all of the pods to start
kubectl -n sshepherd get pods
- Get the External IP for SSHepherd®
kubectl -n sshepherd get services ingress-nginx-controller -o jsonpath='{.status.loadBalancer.ingress[0].ip}'
- Update your DNS with the IP address of your AKS system. Ensure that a DNS entry exists pointing <hostname> to the AKS host. The Administrator Console will not load unless a hostname is used in the URL. https://<hostname>
- Wait for DNS to propagate, then Verify connectivity
Congratulations, your SSHepherd® Command and Control (C3) Server is now up and running.