
Installing the SSHepherd® Agent
Overview
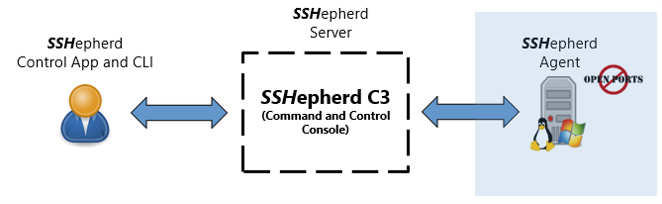
The SSHepherd® Agent is installed on the Linux or Windows Hosts that need to be protected. Once the Agent is installed, you will then register it with the C3 server. Once registered, you can make a connection with the SSHepherd® Control App, and turn off the ports for that Host.
After installing and registering the Agent on a Host, you can make a SSH or RDP connection with the Control App.
System Requirements
- Windows 10
- Windows 11
- Windows Server 2016
- Windows Server 2019
- Windows Server 2022
- Ubuntu 16.04 +
- Debian 11 +
- Red Hat 7.9 +
- CentOS 8+
The SSHepherd® Agent is available for x64 and AArch64 architectures.
Installing the SSHepherd® Agent on Windows
Basic Install and Registration (using local SSHepherd admin account)
- Download and install shepagent.msi
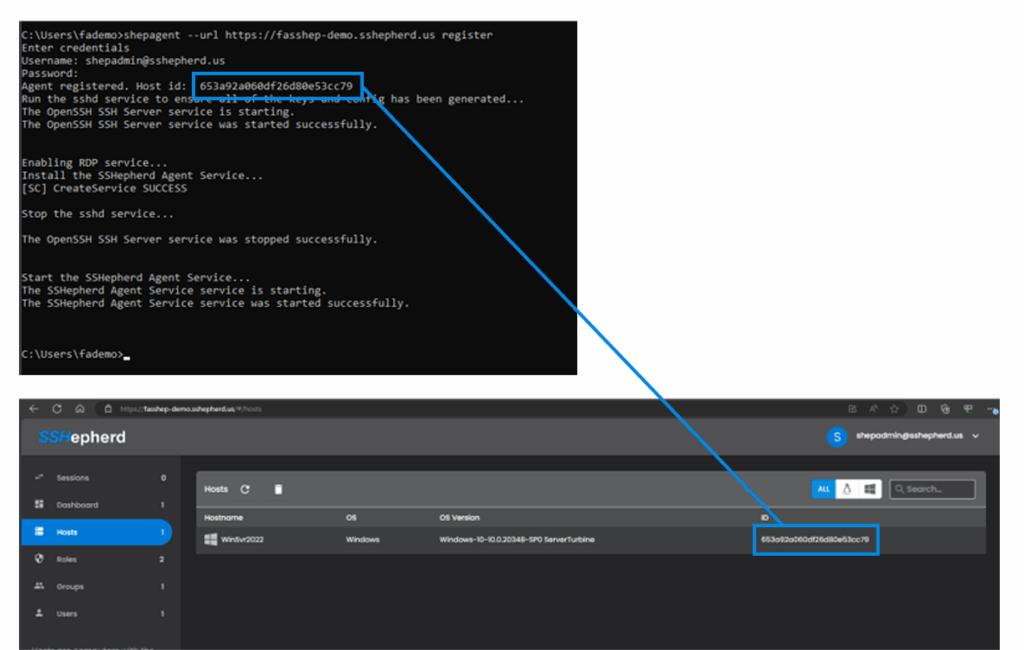
- Once the install wizard completes, go to a command prompt and run the following command to register your new host with the SSHepherd C3 Server. NOTE: Replace yourSSHepherdServer with the URL of your C3 server.
shepagent --url https://yourSSHepherdServer register
- When prompted, enter the SSHepherd® Administrator user and password
- Your Windows host will now be registered with the C3 server and displayed in the SSHepherd® Admin Console.
Basic Install and Registration (using SSO – OIDC, SAML)
If your environment is set-up for SSO (oidc, saml), and you have configured your SSHepherd C3 server and Identity Provider integration, you have 2 options to register your agents.
Option 1: use the device authorization grant with PKCE flow (via your SSO provider)
Option 2: use the –apikey parameter as described in the Advanced Install Options section
If you do not use the –apikey parameter, Option 1 is automatic.
- Download and install shepagent.msi
- Once the install wizard completes, go to a command prompt and run the following command to register your new host with the SSHepherd® C3 Server. NOTE: Replace yourSSHepherdServer with the URL of your C3 server.
shepagent --url https://yourSSHepherdServer register
- Instead of being prompted for a username and password, you’ll see a URL and a validation code. Paste the URL into your web browser and enter the code. The code is only valid for 10 minutes before it expires and can no longer be used to validate your device.
- Next you will be redirected to your SSO provider for authentication and if successful, the agent will complete the registration.
Advanced Install Options
The SSHepherd® Windows agent can also be installed and registered using the –apikey parameter. The API key feature allows:
- Register the agent using API key (no user/password required)
- Unattended installation
- One-step install and registration
- Add Host to group(s) during install/registration
Create your API key
- Login to the SSHepherd® Admin Console as an administrator.
- Click the Keys tab.
- Click the ‘+’ to create a new key.
- Select “Agent Registration” and add a description.
- Click ‘Generate Key’.
- Copy and save the green text key from the dialog box. Once you close this window, you cannot view the key again. Make sure you’ve copied it to a secure location.
- Click Close
Important: Your API key is valid for as long as you want, and can be used for unlimited agent installs. However, it can be quickly destroyed by deleting the key in the SSHepherd® Admin Console from the Keys tab, and rendered useless.
Register an agent using the API key
- Install your Windows agent using the Basic Install steps above.
- Create the API key in the SSHepherd® Admin Console.
- Pass –apikey <api key> parameter to the register command.
Example:
shepagent --url https://yourSSHepherdServer --apikey fv1f8ledhpgVoe0q3m6G7sgqGmKAU0nJ.3c9d63c13b324e3dgt56p0w2vc360226.53e9c29014b2565d960ea344a5cfabcplqwrtg104b580489d08953d3b72a95e05 register
Add agent to group(s) during registration using the API key
- Install your Windows agent using the Basic Install steps above.
- Create the API key in the SSHepherd® Admin Console.
- Pass –apikey <api key> parameter to the register command.
- Pass –groups <comma separated list of groups> parameter to the register command. NOTE: The –apikey parameter is required to use the –groups parameter.
Single Group Example:
shepagent --url https://yourSSHepherdServer --apikey fv1f8ledhpgVoe0q3m6G7sgqGmKAU0nJ.3c9d63c13b324e3dgt56p0w2vc360226.53e9c29014b2565d960ea344a5cfabcplqwrtg104b580489d08953d3b72a95e05 --groups "Group A" register
Multiple Groups Example:
shepagent --url https://yourSSHepherdServer --apikey fv1f8ledhpgVoe0q3m6G7sgqGmKAU0nJ.3c9d63c13b324e3dgt56p0w2vc360226.53e9c29014b2565d960ea344a5cfabcplqwrtg104b580489d08953d3b72a95e05 --groups "Group A, Group B, Group C" register
Unattended Windows Agent Install
The APIKEY and GROUPS parameters can also be used in Windows, directly from the MSI. This allows for unattended installation, and/or reducing the 2-step process (install, then register) to a 1-step process.
How to do it:
msiexec /passive /i shepagent.msi SERVERURL="https://yourSSHepherdServer" APIKEY="<apikey>" GROUPS=<Group A, Group B, Group C>
Example:
msiexec /passive /i shepagent.msi SERVERURL="https://yourSSHepherdServer" APIKEY="fv1f8ledhpgVoe0q3m6G7sgqGmKAU0nJ.3c9d63c13b324e3dgt56p0w2vc360226.53e9c29014b2565d960ea344a5cfabcplqwrtg104b580489d08953d3b72a95e05" GROUPS="Group A, Group B, Group C"
NOTE: It may be necessary to manually refresh your Administrator Console Hosts page to show your new registered Host.
Installing the SSHepherd® Agent on Linux
To install on Debian/Ubuntu:
Adding the repository:
The following must be done once on all linux machines where you want to use shepagent or shepctl.
IMPORTANT: Replace user and password combinations in the commands below with your repository credentials.
sudo apt update && sudo apt install -y wget gnupg apt-transport-https
wget -O - https://user:password@repo.sshepherd.io/fullarmor.gpg.key|sudo apt-key add -
echo deb https://repo.sshepherd.io/debian buster main | sudo tee /etc/apt/sources.list.d/fullarmor.list
echo machine repo.sshepherd.io login user password password | sudo tee /etc/apt/auth.conf.d/fullarmor.conf
sudo apt update
Installing the Agent:
sudo apt install -y shepagent
To install on RedHat/CentOS:
Adding the repository:
The following must be done once on all linux machines where you want to use shepagent or shepctl.
sudo yum install wget
wget -O - https://user:password@repo.sshepherd.io/el$(rpm -E '%{?rhel}')/sshepherd.repo | sudo tee /etc/yum.repos.d/sshepherd.repo
echo "username=user" | sudo tee -a /etc/yum.repos.d/sshepherd.repo
echo "password=password" | sudo tee -a /etc/yum.repos.d/sshepherd.repo
sudo yum update
Installing the Agent
sudo yum install shepagent
Registering the Linux agent
- Local SSHepherd® admin account
- Active Directory admin account
- API key – can use –apikey and –groups to add the Host to SSHepherd® groups
- SSO (oidc, saml)
Registering with a local SSHepherd® admin account
- Once the install has completed, run the following command to register the agent. NOTE: Replace yourSSHepherdServer with the URL of your C3 server.
sudo shepagent --url https://yourSSHepherdServer register
- When prompted, enter the SSHepherd® Administrator user and password
- Your Linux host will now be registered with the C3 server and displayed in the SSHepherd® Admin Console.
Registering with an Active Directory admin account
- Once the install has completed, run the following command to register the agent. NOTE: Replace yourSSHepherdServer with the URL of your C3 server.
sudo shepagent --url https://yourSSHepherdServer register
- When prompted, enter the Active Directory Administrator user and password
- Your Linux host will now be registered with the C3 server and displayed in the SSHepherd® Admin Console.
Registering with SSO – OIDC, SAML
If your environment is set-up for SSO (oidc, saml), and you have configured your SSHepherd® C3 server and Identity Provider integration, you have 2 options to register your Linux agents.
Option 1 – use the device authorization grant with PKCE flow (via your SSO provider)
Option 2 – use the –apikey parameter as described below
If you do not use the –apikey parameter, Option 1 is automatic.
The SSHepherd Linux agent can also be registered using the –apikey parameter. The API key feature allows:
- Register the agent using API key (no user/password required)
- Add Host to group(s) during install/registration
Create your API key
- Login to the SSHepherd® Admin Console as an administrator.
- Click the Keys tab.
- Click the ‘+’ to create a new key.
- Select “Agent Registration” and add a description.
- Click ‘Generate Key’.
- Copy and save the green text key from the dialog box. Once you close this window, you cannot view the key again. Make sure you’ve copied it to a secure location.
- Click Close
Important: Your API key is valid for as long as you want, and can be used for unlimited agent installs. However, it can be quickly destroyed by deleting the key in the SSHepherd® Admin Console from the Keys tab, and rendered useless.
Register an agent using the API key
- Install your Linux agent using the Install steps above.
- Create the API key in the SSHepherd® Admin Console.
- Pass –apikey <api key> parameter to the register command.
Example:
sudo shepagent --url https://yourSSHepherdServer --apikey fv1f8ledhpgVoe0q3m6G7sgqGmKAU0nJ.3c9d63c13b324e3dgt56p0w2vc360226.53e9c29014b2565d960ea344a5cfabcplqwrtg104b580489d08953d3b72a95e05 register
Add agent to group(s) during registration using the API key
- Install your Linux agent using the Install steps above.
- Create the API key in the SSHepherd® Admin Console.
- Pass –apikey <api key> parameter to the register command.
- Pass –groups <comma separated list of groups> parameter to the register command. NOTE: The –apikey parameter is required to use the –groups parameter.
Single Group Example:
sudo shepagent --url https://yourSSHepherdServer --apikey fv1f8ledhpgVoe0q3m6G7sgqGmKAU0nJ.3c9d63c13b324e3dgt56p0w2vc360226.53e9c29014b2565d960ea344a5cfabcplqwrtg104b580489d08953d3b72a95e05 --groups "Group A" register
Multiple Groups Example:
sudo shepagent --url https://yourSSHepherdServer --apikey fv1f8ledhpgVoe0q3m6G7sgqGmKAU0nJ.3c9d63c13b324e3dgt56p0w2vc360226.53e9c29014b2565d960ea344a5cfabcplqwrtg104b580489d08953d3b72a95e05 --groups "Group A, Group B, Group C" register