SSHepherd Documentation
Protecting MySQL
Overview
Below are the steps to secure your MySQL Server using SSHepherd so that you can close the open listening port and still allow access to the database to authorized users.
Prereqs
- SSHepherd Agent installed on your MySQL Server
- SSHepherd Control App/CLI installed on a client machine
- Your user account and the MySQL Server Host are in the same SSHepherd Group
Configure the MySQL Server Host
- Configure the Agent to connect the mySQL server over a SSHepherd tunnel.
- Edit the agent.conf file to add a whitelist entry. This will whitelist the application and port to run through SSHepherd.
sudo nano -w /etc/SSHepherd/agent.conf
- In your agent.conf file, add ,”whitelist”:[3306], as shown in the example below.
{“id”: “123qwe456rty789asd”, “url”: “https://sshepherd.us”, “loglevel”:”ERROR”, ”whitelist”:[3306]}
- Save and Exit the agent.conf file.
- Restart the shepagent.service.
sudo systemctl restart shepagent
Using the SSHepherd Control CLI to Connect to MySQL Server
- On your machine with the SSHepherd Control CLI installed, open a terminal or command prompt and login to SSHepherd. Replace ‘your.sshepherd.server‘ with your SSHepherd server URL.
shepctl --url https://your.sshepherd.server login
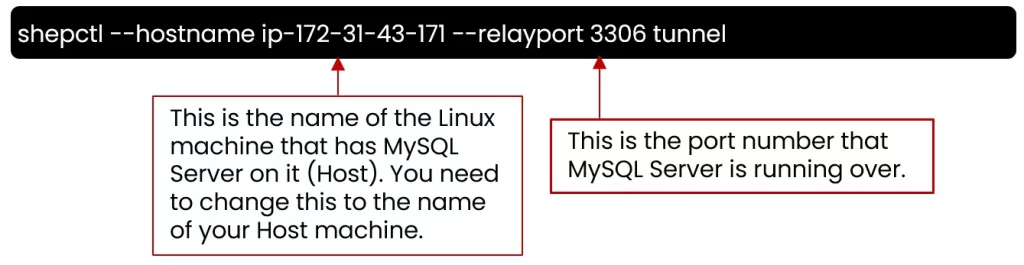
- Next, create the SSHepherd tunnel.
shepctl --hostname ip-172-31-43-171 --relayport 3306 tunnel
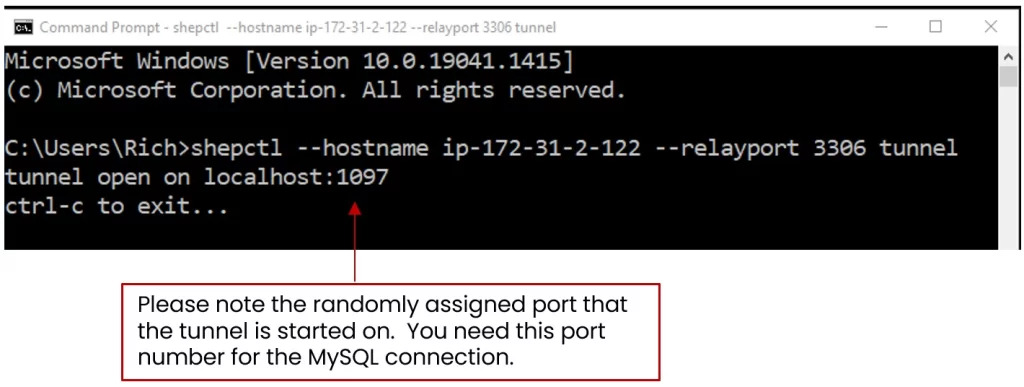
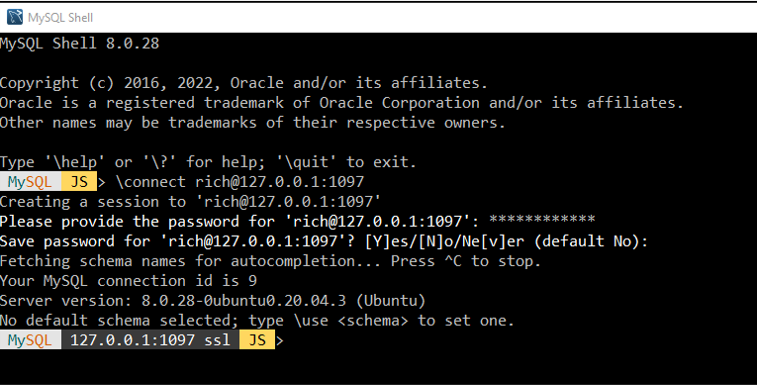
- Once your tunnel is established, open a 2nd terminal or command prompt for your MySQL Shell connection through SSHepherd.
- Connect to localhost using the randomly assigned port number from step 1.

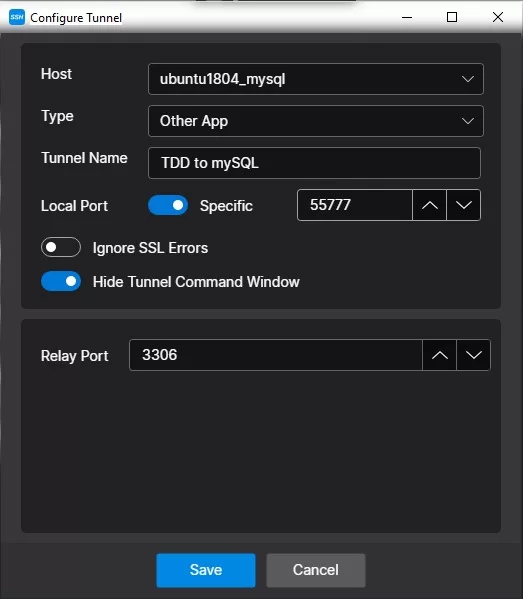
Using the SSHepherd Control App to Connect to MySQL Server
- Login to the SSHepherd Control App
- Click the + button in the top right on the UI to configure a new tunnel
- Select a Host. This field contains a list of all Hosts you have been granted access to. Select your mySQL Server Host from the list
- Select the Type. This field is the connection type for the session. Choose Other App from the list.
- Tunnel Name. This field allows you to give the tunnel a descriptive name.
- Local Port. By default, this option is set to ‘Automatic’ and will select a random port for you. In this example, we have set a specific port – 55777.
- Ignore SSL Errors. By default, SSHepherd will not ignore SSL Errors. This option should only be used in evaluation and test environments, not for production environments.
- Hide Tunnel Command Window. By default, this option will hide the tunnel command window.
- Relay Port. This is the port number that was whitelisted in the SSHepherd Agent Config file. Make sure you enter that same port number.
- Click Save.