
Creating a TCP/IP Application Session
In addition to RDP and SSH, SSHepherd® can also protect your TCP/IP applications. It does this by running the application through localhost and connecting to it from the Control App or shepctl CLI.
To help with the configuration settings, we have documented just a few of the applications, web servers, and database configuration settings that can be protected by SSHepherd. Contact us if there are other application configurations that you would like us to provide.
Whitelist your TCP/IP Application port on the SSHepherd Agent/Host
From your Host with the SSHepherd® Agent installed, run the following command to whitelist your application port (replace the port number with the port number specific to your application:
shepagent --port 80 add-whitelist
You should see confirmation that the port was added to the whitelist, and all whitelisted ports will be displayed. Once you have finished editing the whitelist, you must restart the shepagent service before the changes will be effective.
Creating a secure tunnel using SSHepherd® CLI
From your computer with the Control app/shepctl CLI installed, run the following command:
shepctl --hostname your-agent-hostname --relayport 80 tunnel

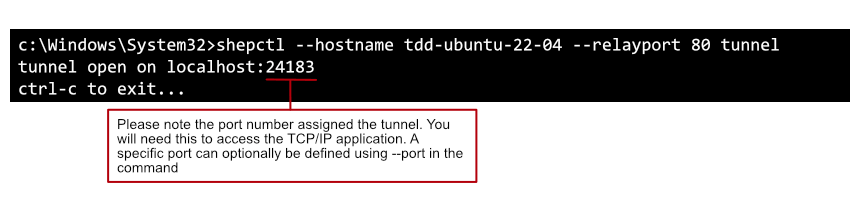
In this example, the TCP/IP application is a web app, so after we’ve created our tunnel we can access the application from a web browser using localhost and the random port assigned by shepctl (http://127.0.0.1:24183). You can also configure shepctl to use a defined port.

Creating a secure tunnel using SSHepherd® control CLI and a defined port
SSHepherd® can also be configured to create a tunnel using a specific port. In order to do this, run the same command as above, with the addition of the –port argument.
shepctl --hostname your-agent-hostname --relayport 80 --port 9999 tunnel

You will now have access to your TCP/IP application using the port you specified. localhost:9999
Creating a secure tunnel using SSHepherd® Control App
- Launch the SSHepherd® Control App.
- Click the ‘+’ icon to bring up the ‘Configure Tunnel’ window.
- Select a Host. This field contains a list of all Hosts you have been granted access to.
- Select the Type. This field is the connection type for the session. Choose Other App from the list.
- Tunnel Name. This field allows you to give the tunnel a descriptive name.
- Local Port. By default, this option is set to ‘Automatic’ and will select a random port for you. The other option allows you to manually set a port for this tunnel.
- Relay Port. This field is for the port your application is configured to use. It is also the port that you have whitelisted in the SSHepherd® agent configuration file.
- Save the Tunnel.
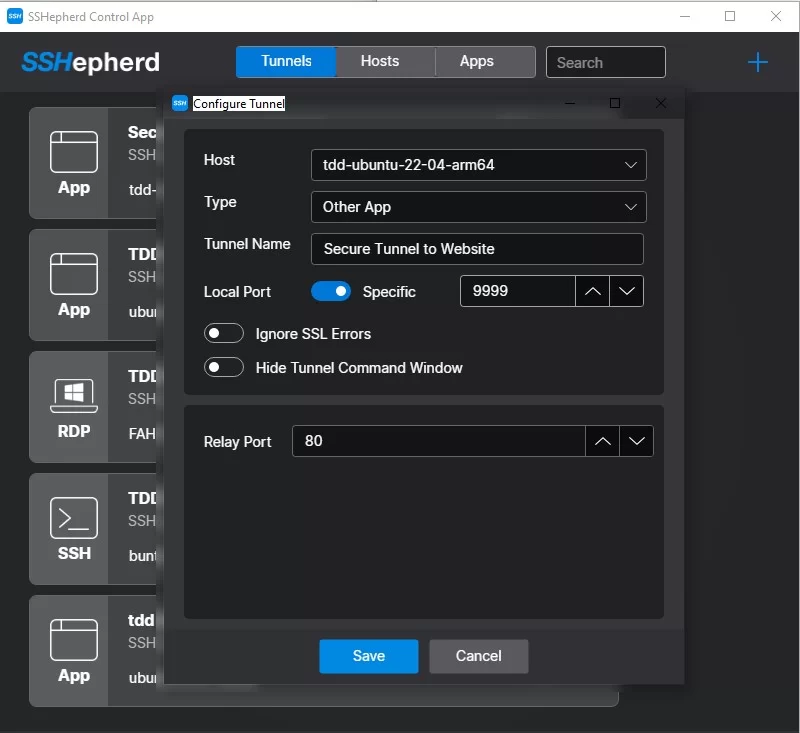
- Click the toggle switch for the tunnel you just created to establish the SSHepherd® tunnel.
- You now have a secure tunnel open on localhost port 9999.