Creating the SSHepherd® C3 Server SSL Certificate
Quick Start: Create your SSHepherd® certificates using Let’s Encrypt
There are 2 options for using Let’s Encrypt to create your SSHepherd® certificates.
- Install SSHepherd® using the provided install script with the Let’s Encrypt option to allow Let’s Encrypt to generate and manage your certificates (preferred)
- Install SSHepherd® using the following manual certificate creation steps, then continue to the SSHepherd C3 main install steps.
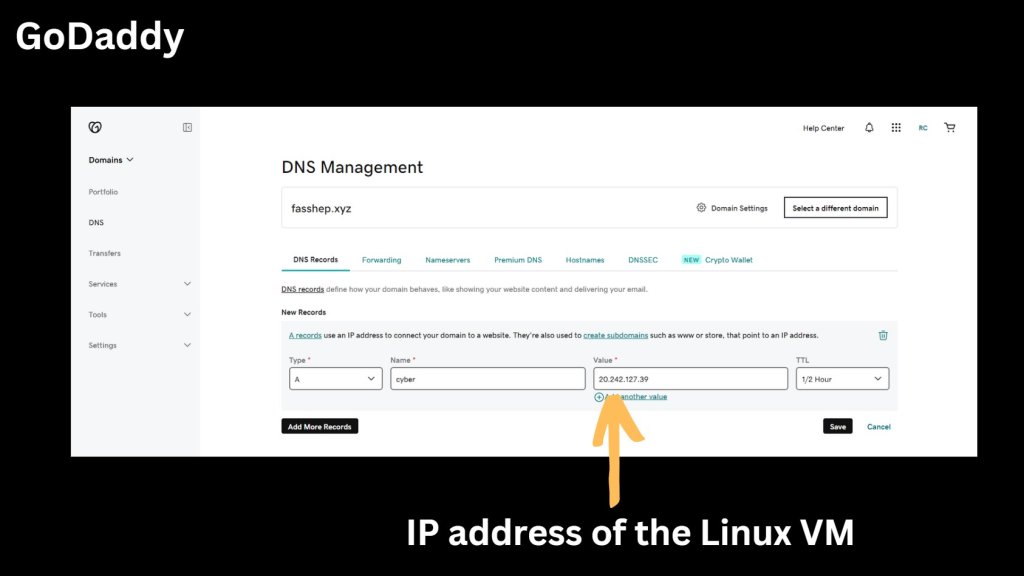
The following manual steps will walk you through creating SSHepherd® certificates required to install the SSHepherd® C3 server. This example uses GoDaddy for DNS, and Let’s Encrypt to create the certificates and is designed as a Quick Start option. Your providers may have different requirements.
If you have an existing certificate and won’t be using Let’s Encrypt, advance to the section below to verify your certificate and make any necessary changes.
Assumptions for this video and Quick Start steps:
- Linux Ubuntu VM (2 vCPUs, 8 GiB)
- Open ports 22 (for ssh), 80, 443, 1935
- Close 22 and 80 when finished
- GoDaddy for DNS entries
- Let’s Encrypt to create the certs
Quick Start: Steps for creating your SSHepherd® Certificates using Let’s Encrypt
- Bring up your Linux Ubuntu vm, and document your IP Address
- Open ports 22, 80, 443, and 1935
- 22 and 80 will be closed after installation is complete
- Create a DNS entry in your DNS zone for your host and IP Address from step 1.

- SSH to your Linux Ubuntu vm
- Run the following commands to update Ubuntu, install certbot for nginx, and create and deploy Let’s Encrypt Certificates.
sudo apt update
sudo apt install certbot python3-certbot-nginx
sudo certbot --nginx
- Enter your email address and agree to the license agreement when prompted.
- When asked to enter the domain name you would like on your certificate, enter the domain name from GoDaddy. (ex. cyber.fasshep.xyz).
- You should see a message when the process is completed successfully.
- Run the follow command to verify the files were created. You should see 4 certificate files.
sudo ls -l /etc/letsencrypt/live/your_domain
- Next, download the root certificate.
wget https://letsencrypt.org/certs/isrgrootx1.pem -O isrgrootx1.pem
- Bundle the certificates:
sudo sh -c 'cat /etc/letsencrypt/live/your_domain/cert.pem /etc/letsencrypt/live/your_domain/chain.pem isrgrootx1.pem > /etc/letsencrypt/live/your_domain/combined_fullchain.pem'
- Copy the combined certificate to the home directory and rename it from .pem to .crt.
sudo cp /etc/letsencrypt/live/your_domain/combined_fullchain.pem /home/Shepadmin/your_domain.crt
- Verify the .crt file.
openssl verify -CAfile /home/Shepadmin/your_domain.crt /home/Shepadmin/your_domain.crt
- Copy the private key .pem file to the Home directory and rename it to the .key extension.
sudo cp /etc/letsencrypt/live/your_domain/privkey.pem /home/Shepadmin/your_domain.key
- Change the ownership of the .crt and .key files to the admin user
sudo chown Shepadmin:Shepadmin /home/Shepadmin/your_domain.crt
sudo chown Shepadmin:Shepadmin /home/Shepadmin/your_domain.key
- You are now ready to move on to the SSHepherd® C3 Server Installation.
If you are following along with the above video and steps, and you want to continue installing SSHepherd on MicroK8s using the provided install script, please see the Installing on MicroK8s – Using the Script section of the SSHepherd® C3 Server Installation page to continue.
If you have an existing domain and certificate
In order to install the SSHepherd® C3 Server, you will need a passwordless certificate file, in .PEM format, and a passwordless .KEY file, in .PEM format. Depending on your certificate file, you may need to add the intermediate certificates to it using a few simple commands. This section will guide you through verifying your certificate file and making any necessary changes.
Verify your certificate
Begin by verifying your SSL certificate.
Run the following openssl command (replace <certificate file name> with the name of your cert file:
openssl verify <certificate file name>
Example: openssl verify mycert.pem
If the command returns something similar to the error below, you will need to add additional certificates to your certificate file.
CN = mydomain.com
error 20 at 0 depth lookup: unable to get local issuer certificate
error mycert.pem: verification failed
Most issuers have bundles, and the filename will usually contain the word “bundle”. You will need to append the contents of your “bundle” certificate file to your certificate file used with SSHepherd®.
Combining certificate files
Example linux command:
cat mycert.pem CA_Bundle.pem > combined.pem
To verify the new combined.pem file:
openssl verify -untrusted <( { openssl x509 >/dev/null; cat; } < combined.pem ) <(openssl x509 < combined.pem)
If done correctly, the above command should return something like:
/dev/fd/62: OK
If so, your certificate file is now ready to use for your SSHepherd® C3 Server Install (you want to use combined.pem going forward).
What if I completed the C3 server install using an unsupported certificate file?
If you complete the install using an unsupported certificate file, you will be unable to create your initial administrator user account and will see a SSL error instead. Fortunately, you can resolve this by creating a combined certificate file using the steps above, and then run the following commands to remove the old certificate and import the new combined certificate on your C3 server.
These commands will remove the old certificate and import the new certificate:
Microk8s
Note: Replace $keyFile and $crtFile with your actual file names.
microk8s kubectl -n sshepherd delete secret aks-ingress-tls
microk8s kubectl -n sshepherd create secret tls aks-ingress-tls --key $keyFile --cert $crtFile
After the above commands are complete, run the install command again (Step 9 in the C3 install guide):
$ ./shepserver-microk8s.sh <hostname> <crt file> <unencrypted key file> <registry host> <registry user> <registry password>
Azure AKS
Note: Replace $keyFile and $crtFile with your actual file names.
kubectl -n sshepherd delete secret aks-ingress-tls
kubectl -n sshepherd create secret tls aks-ingress-tls --key $keyFile --cert $crtFile
After the above commands are complete, run the install command again (Step 6 in the C3 install guide):
$ ./shepserver-microk8s.sh <hostname> <crt file> <unencrypted key file> <registry host> <registry user> <registry password>
