
Least Privilege Access Account Setup
Least Privilege Access (LPA) is a security principle where users, applications, and services are granted only the minimum permissions necessary to perform their required tasks, reducing risk and potential attack surface.
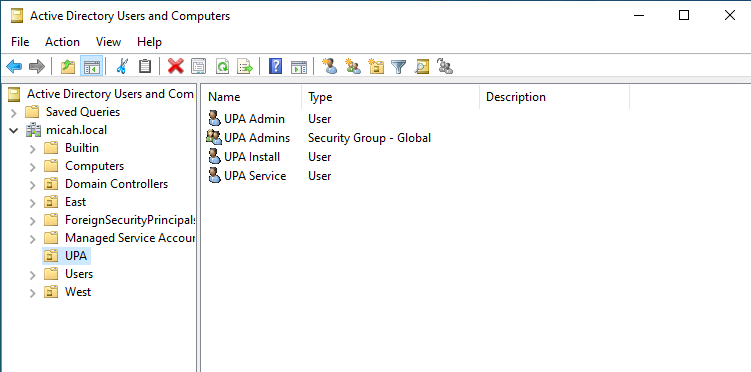
This document provides step-by-step instructions for setting up Least Privilege Access (LPA) accounts for a UPA deployment. We’ll create the following as examples for you:
- Organizational Unit (OU) named “UPA”
- Administrator Group named “UPA Admins”
- User Accounts which we will place inside the UPA OU:
- UPA_Admin – this will be for UPA administrators
- UPA_Service – this will be for the UPA runtime service account
Please follow the instructions below to setup the LPA permissions.
Step 1: Create the UPA Organizational Unit
- Open Active Directory Users and Computers
- Right-click at the domain level
- Select New > Organizational Unit
- Enter a name for the new OU (e.g., “UPA”)
- Click OK
Step 2: Create the UPA Admins Group
- Within the newly created OU, right-click and select New > Group
- Create a group named “UPA Admins” (or your preferred name)
- Set Group scope to Global or Universal
- Set Group type to Security
- Click OK
Step 3: Create User Accounts
Within the UPA OU, create the following two user accounts:
Account #1: UPA_Service (Application Runtime Service Account)
- Right-click in the UPA OU → New > User
- Enter username: UPA_Service
- Complete the user creation wizard
- Set a secure password
Account #2: UPA_Admin (Administrative User)
This is an optional account (users will most likely use their corporate AD account). Corporate account must be in the UPA Admins security group (created above) for initial access.
- Right-click in the UPA OU → New > User
- Enter username: UPA_Admin
- Complete the user creation wizard
- Set a secure password
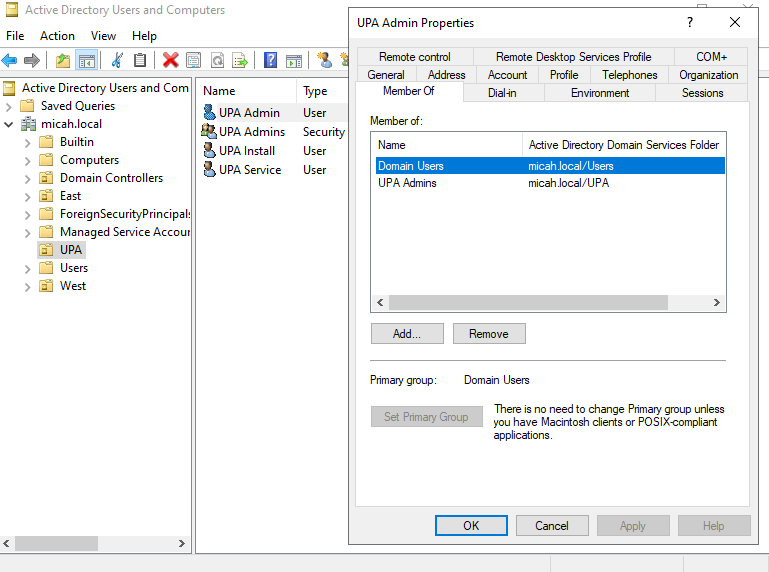
Step 4: Configure UPA_Admin Account
- Right-click UPA_Admin user → Properties
- Go to Member Of tab → Click Add
- Add the user to the UPA Admins group you created earlier
- Click OK
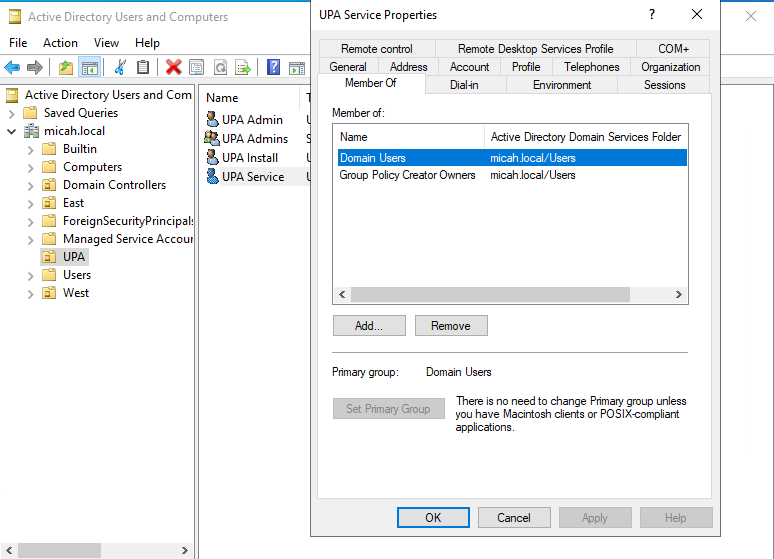
Step 5: Configure UPA_Service Account Permissions
Add to Required Groups:
- Right-click UPA_Service user → Properties
- Go to Member Of tab → Click Add
- Add the user to Group Policy Creator Owners group
- Click OK
Configure Active Directory Permissions:
- Open the ADSI Edit utility (adsiedit.msc)
- From the Action menu, select Connect to…
- In the Connection Settings dialog, leave the default options (Default naming context, logged-in domain) and click OK.
- In the left pane, expand Default naming context
- Expand your domain node (for example, DC=example,DC=com)
- Right-click on CN=System → Properties
- Go to Security tab → Click Add
- Add the UPA_Service user → Click OK
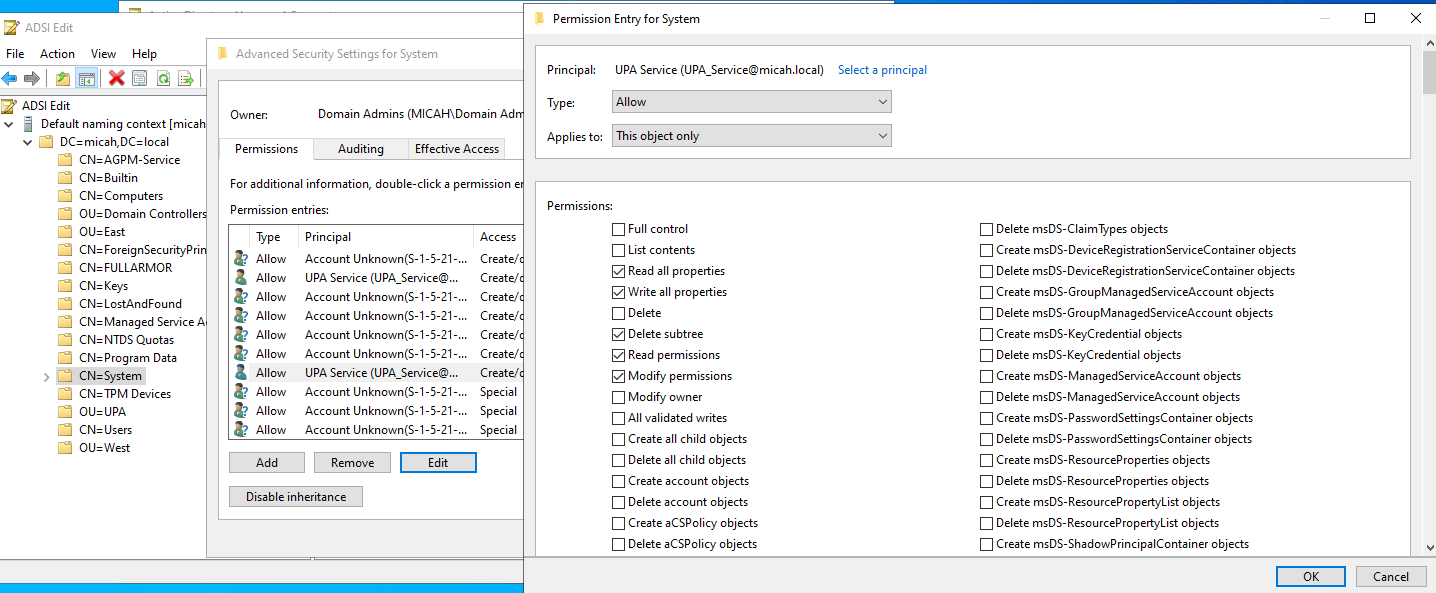
- Select UPA_Service user → Click Advanced
- Select UPA_Service from the list → Click Edit
- In the Permission Entry window, scroll down and click to Clear all existing permissions
- Add the following permissions:
- Read all properties
- Write all properties
- Delete subtree
- Read permissions
- Modify permissions (and then scroll down a bit)
- Create container objects
- Delete container objects (and then scroll down more)
- Create ipsecFilter objects
- Delete ipsecFilter objects
- Create ipsecISAKMPPolicy objects
- Delete ipsecISAKMPPolicy objects
- Create ipsecNegotiationPolicy objects
- Delete ipsecNegotiationPolicy objects
- Create ipsecNFA objects
- Delete ipsecNFA objects
- Create ipsecPolicy objects
- Delete ipsecPolicy objects (and then scroll down more and look on the right column)
- Create serviceConnectionPoint objects
- Delete serviceConnectionPoint objects
- Click OK to close the dialog boxes and then close ADSI Edit
Grant Read Permissions on the NetworkList Registry Key
- Launch Registry Editor (regedit)
- Navigate to the Key –
HKEY_LOCAL_MACHINE\Software\Microsoft\Windows NT\CurrentVersion\NetworkList- Right-click the NetworkList folder → Permissions…
- Click Advanced
- Click Add
- Click Select a principal
- Enter the service account name (e.g., UPA_Service) → Check Names → OK.
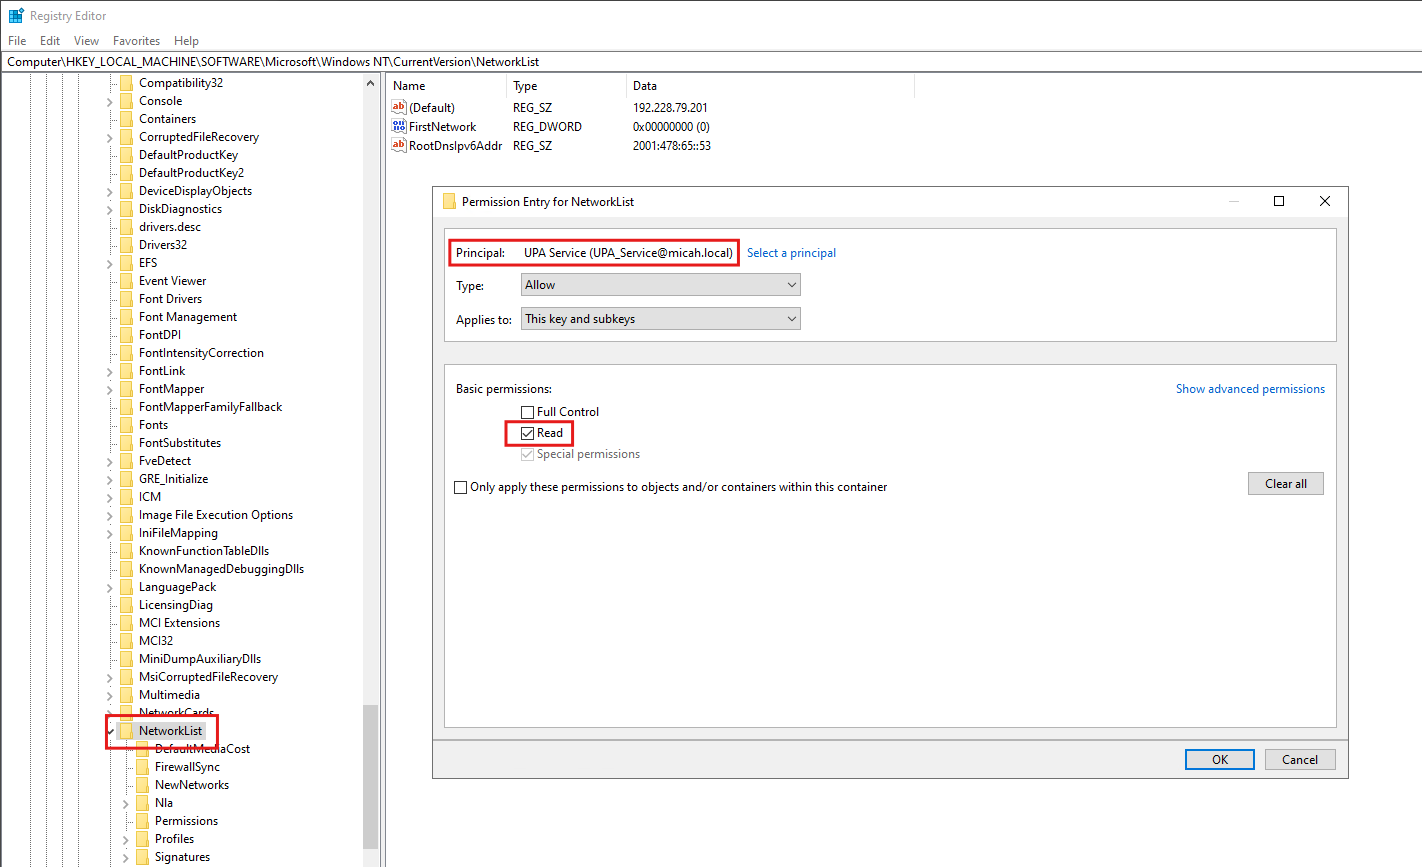
- Verify the following selections:
- Type is Allow
- Applies to is This key and subkeys
- In the Basic Permissions area:
- Select the Read check box
- (Optional) If selected, clear the Full Control check box
- Click Ok to close the dialog boxes and then close Registry Editor
Grant the Manage auditing and security log user right:
- Open Group Policy Management Console (GPMC)
- Edit the Domain Controller Policy (or create a new GPO and link it accordingly)
- In the left pane, expand:
Forest → Domains → <YourDomain> → Domain Controllers - Right-click Default Domain Controllers Policy → select Edit.
- In the left pane, expand:
- Navigate to User Rights Assignment
- In the Group Policy Management Editor, go to:
Computer Configuration → Policies → Windows Settings → Security Settings → Local Policies → User Rights Assignment
- In the Group Policy Management Editor, go to:
- Locate the Policy
- In the right-hand pane, double-click Manage auditing and security log.
- Click to Define these policy settings
- Add the Service Account
- Click Add User or Group…
- Click Browse
- Type the service account name (e.g., UPA_Service)
- Click Check Names to validate.
- Click OK.
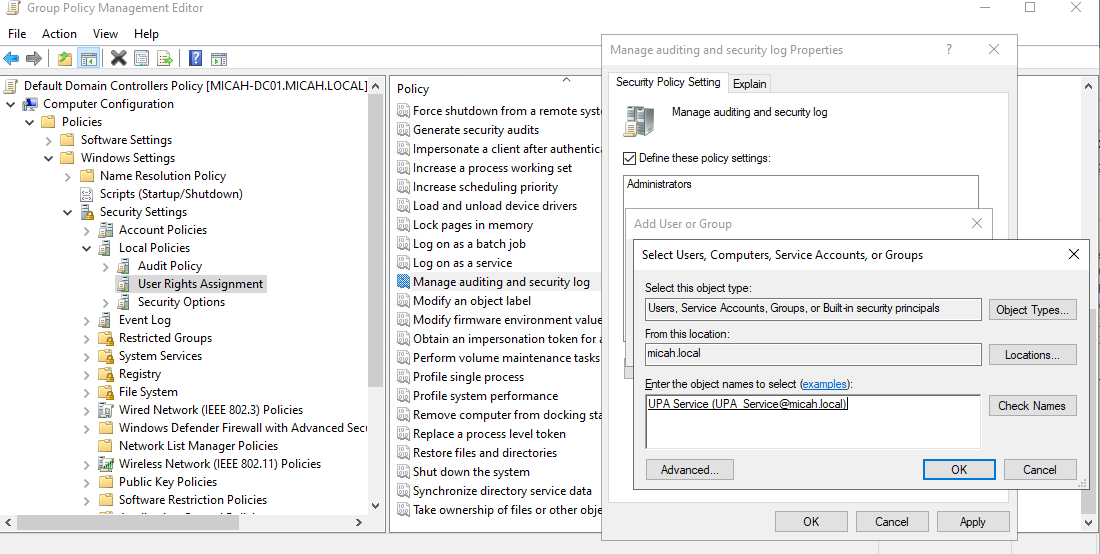
- Confirm and Save
- Click Apply → OK
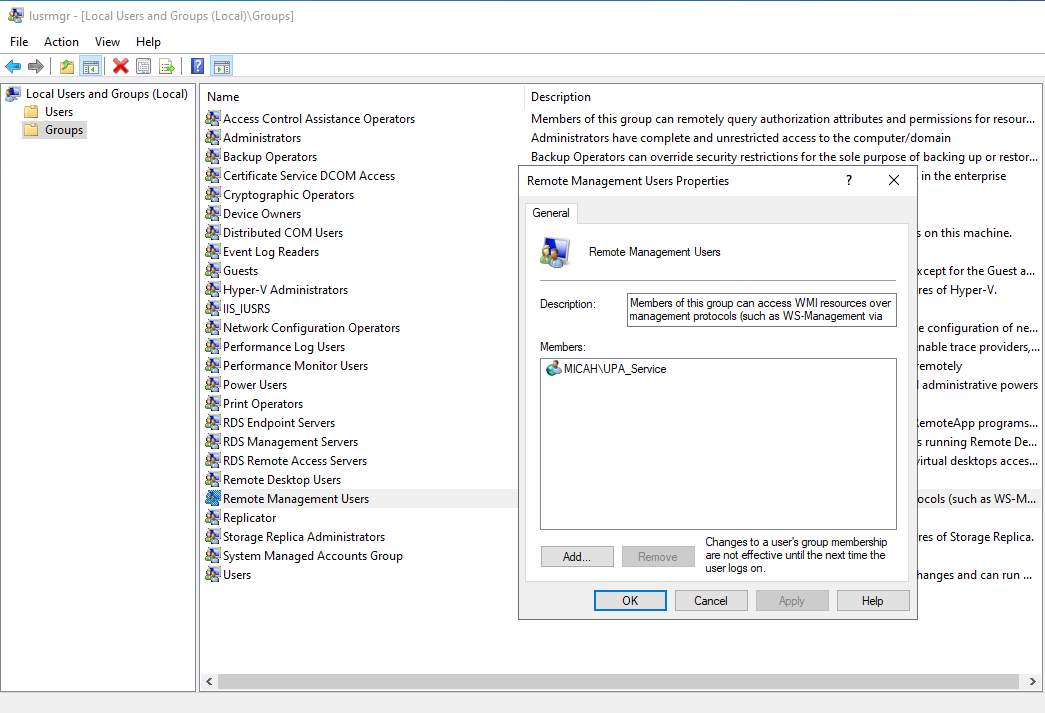
Grant permissions to enumerate devices
If you want to create or modify Devices in Preferences (Preferences/Control Panel/Devices), then we need to give the LPA account permission to enumerate the devices.
- On the machine where UPA is installed, open Local Users and Groups:
- Press Win + R, type lusrmgr.msc, and press Enter
- In the left pane, select Groups
- In the Groups list, right-click Remote Management Users, then select Add to Group
- Click Add
- Enter the service account name (e.g., UPA_Service), then click Check Names to resolve it
- Click OK, then click OK again to close and save
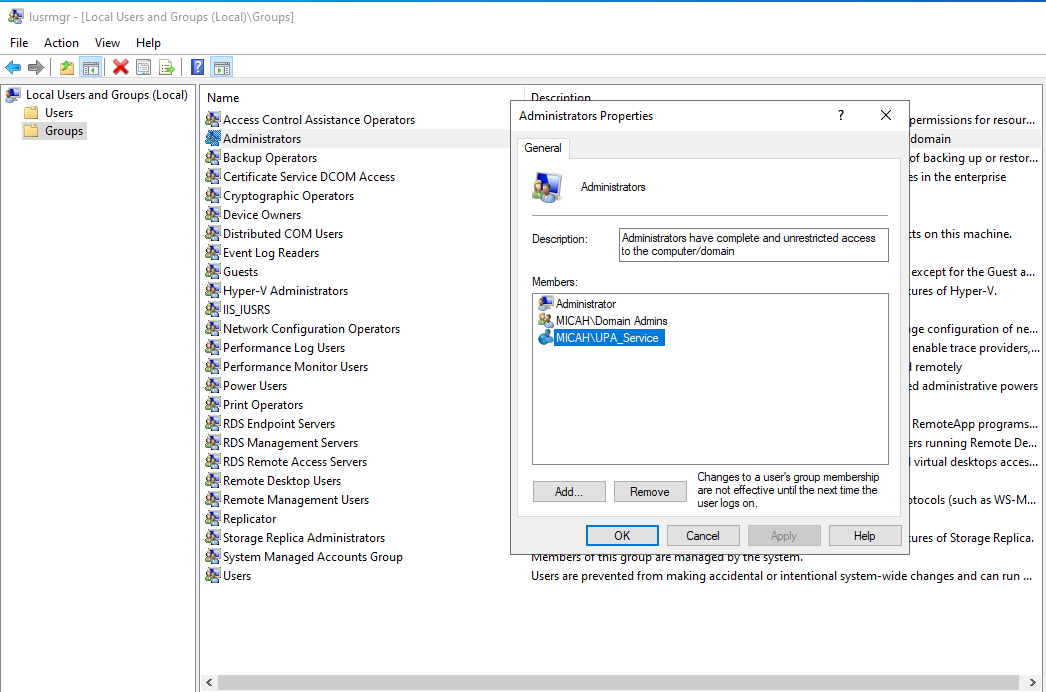
Grant permissions to generate AppLocker Publisher Rules
If you want to create a new AppLocker Rule (specifically adding a Reference File), follow the instructions below to grant permission to the LPA account.
- On the machine where UPA is installed, open Local Users and Groups:
- Press Win + R, type lusrmgr.msc, and press Enter
- In the left pane, select Groups
- In the Groups list, right-click Administrators, then select Add to Group
- Click Add
- Enter the service account name (e.g., UPA_Service), then click Check Names to resolve it
- Click OK, then click OK again to close and save
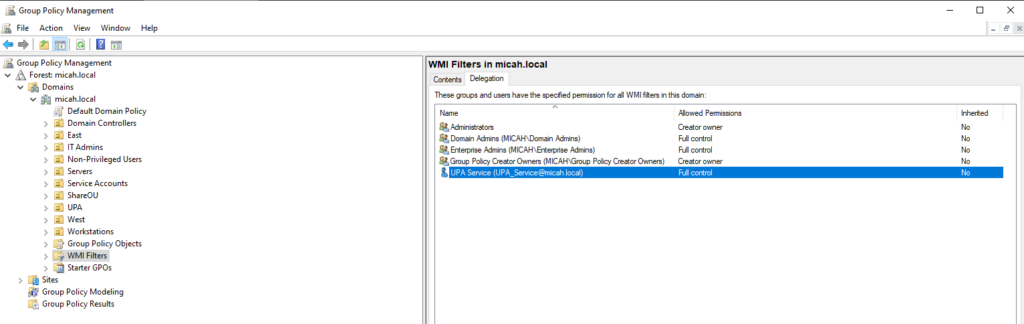
Add the LPA Service Account to the Delegation Permissions for WMI Filters
- In GPMC, navigate to the WMI Filters node
- Expand Forest: yourdomain
- Expand Domains
- Select your domain (e.g., micah.local)
- Click WMI Filters
- Open the Delegation tab
- With WMI Filters selected, the right pane will show tabs
- On the right panel, click the Delegation tab
- Add the LPA Service account
- Click Add
- Enter the account name (e.g. UPA_Service) -> Check Names
- Click OK
- Assign permission level
- For Permissions, select Full Control
- Apply and close
- Click OK
- Close GPMC when finished
Assign AD Domain and Site Permissions for UPA_Service
These steps show how to assign the required permissions to the UPA_Service account at both the Domain and Site levels in Active Directory.
The rights include:
- Generate Resultant Set of Policy (Planning) → Extended permission that allows the account to run RSoP modeling (what-if analysis of GPO application).
- Generate Resultant Set of Policy (Logging) → Extended permission that allows the account to run RSoP logging (report on what GPOs were actually applied).
- Read gpLink → Property-level permission that allows reading of the gpLink attribute, which stores linked GPOs for the domain or site.
- Write gpLink → Property-level permission that allows modifying the gpLink attribute to add or remove GPO links.
- Read gpOptions → Property-level permission that allows reading of the gpOptions attribute, which controls inheritance options (e.g., No Override, Block Inheritance).
- Write gpOptions → Property-level permission that allows modifying the gpOptions attribute to configure inheritance behavior.
Part 1 – Assign Permissions at the Domain Level
- Open Active Directory Users and Computers (ADUC)
- On a Domain Controller, press Windows + R, type dsa.msc, and press Enter.
- Enable Advanced Features
- In ADUC, click the View menu → select Advanced Features.
- Open Domain Properties
- In the left pane, right-click your domain root (e.g., your.domain) → Properties.
- Go to the Security Tab
- Select the Security tab → click Advanced.
- Add the Service Account
- Click Add → Select a principal.
- Enter UPA_Service (or UPA_Service@your.domain) → click Check Names → OK.
- Set Apply Scope
- In “Permission Entry,” set:
- Type: Allow
- Applies to: This object and all descendant objects
- In “Permission Entry,” set:
Decide on “Clear all”
- If this is the first time you are assigning permissions to this service account at the domain level → Leave existing permissions as they are (no need to Clear all).
- If the service account already has existing delegated permissions and you want to enforce strict Least Privilege Access (LPA) → scroll down to the bottom and click Clear all to remove old rights. Then explicitly grant only the required permissions below.
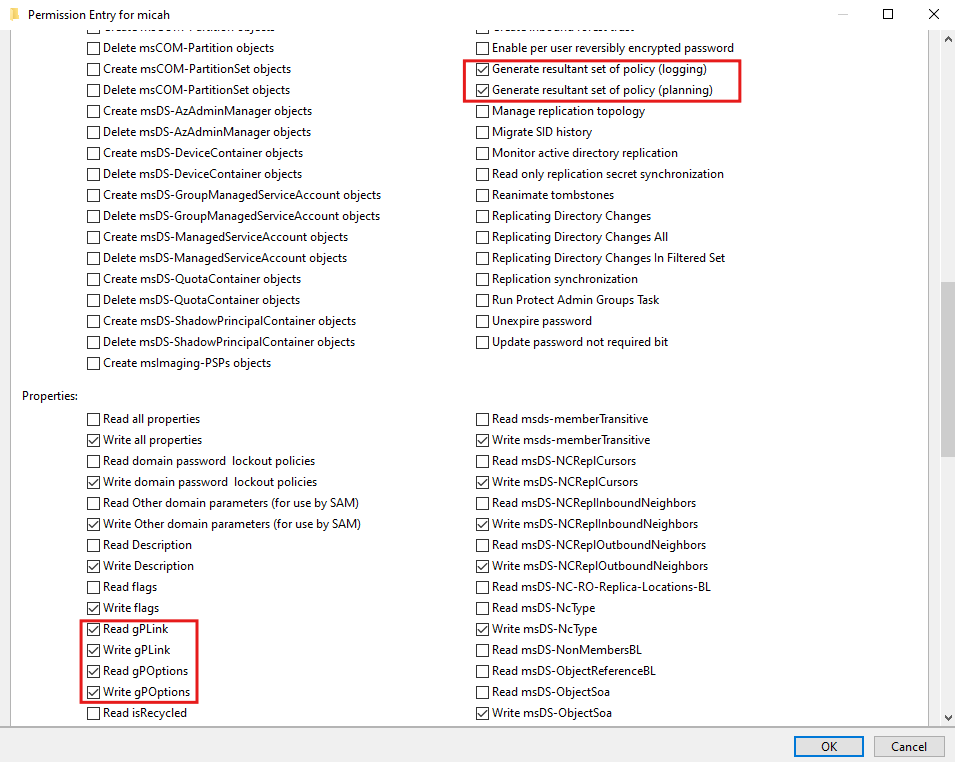
- Assign Required Permissions
- Check the boxes for:
- Generate resultant set of policy (logging) /scroll down and on the right column
- Generate resultant set of policy (planning) /scroll down and on the right column
- Read gpLink /scroll down and on the left column
- Write gpLink /scroll down and on the left column
- Read gpOptions /scroll down and on the left column
- Write gpOptions /scroll down and on the left column
- Check the boxes for:
- Confirm and Save
- Click OK on all dialog boxes to apply.
- Verify UPA_Service is listed with the correct permissions
Part 2 – Assign Permissions at the Site Level
- Open Active Directory Sites and Services
- Press Windows + R, type dssite.msc, and press Enter.
- Enable Advanced Features (if needed)
- In the console, click View → select Show Services Node.
- Open Site Properties
- Expand Sites.
- Right-click the desired site (e.g., Default-First-Site-Name) → Properties.
- Go to Security Settings
- Select the Security tab → click Advanced.
- Add the Service Account
- Click Add → Select a principal.
- Enter UPA_Service → click Check Names → OK.
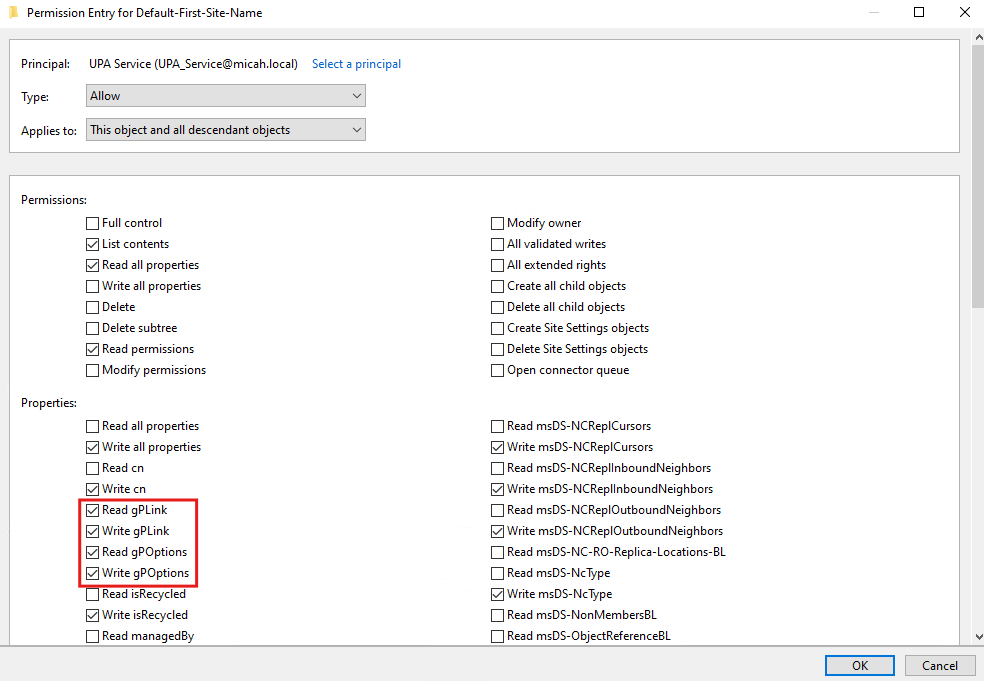
- Set Apply Scope
- In “Permission Entry,” set:
- Type: Allow
- Applies to: This object and all descendant objects
- In “Permission Entry,” set:
Decide on “Clear all”
- If this is the first time you are assigning permissions to this service account at the domain level → Leave existing permissions as they are (no need to Clear all).
- If the service account already has existing delegated permissions and you want to enforce strict Least Privilege Access (LPA) → scroll down to the bottom and click Clear all to remove old rights. Then explicitly grant only the required permissions below.
- Assign Required Permissions
- Check the boxes for:
- Read gpLink
- Write gpLink
- Read gpOptions
- Write gpOptions
- Check the boxes for:
- Confirm and Save
- Click OK on all dialog boxes to apply.
- Close Active Directory Sites and Services.
Step 6: Begin Installation
Now that you have the LPA accounts and permissions configured, let’s begin the installation.
- Double-click on UPA_Setup.exe
- Proceed with the UPA installation process
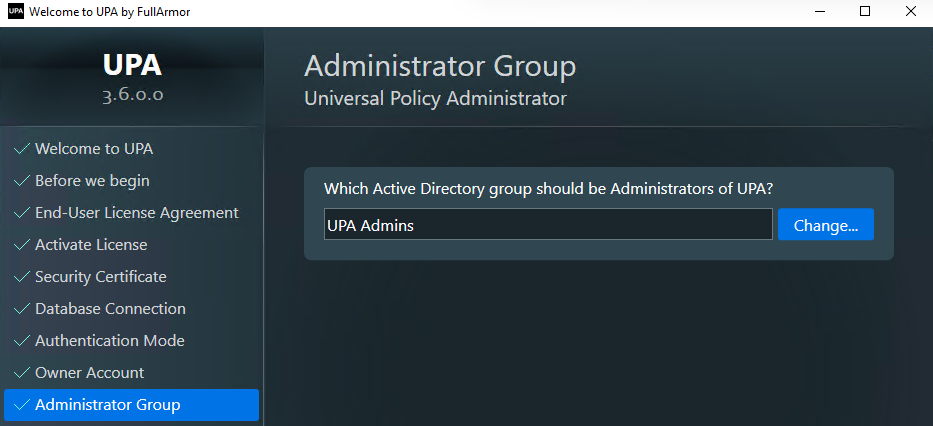
- During installation, specify the UPA Admins group name when prompted
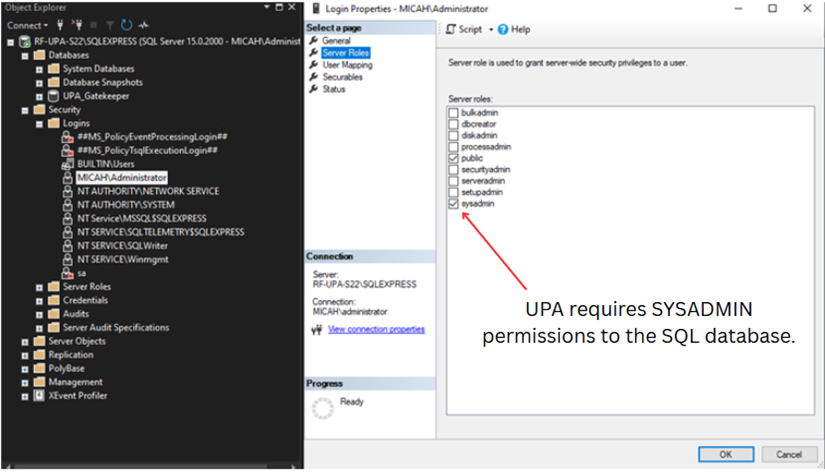
SQL Server Notes:
A SYSADMIN-level account is required for SQL Server access. You can use either SQL Server Authentication or Windows (Integrated) Authentication.
- If using SQL Server Authentication, ensure the account has SYSADMIN privileges on the SQL Server.
- If using Windows Authentication, either the UPA application server or a Windows AD user must be granted SYSADMIN privileges on the SQL Server.
- If SQL Server is installed on the same system as the UPA deployment, the logged-in user performing the deployment must have SYSADMIN rights.
- If SQL Server is hosted on a separate server, the UPA deployment server itself must be granted SYSADMIN privileges on the SQL Server.
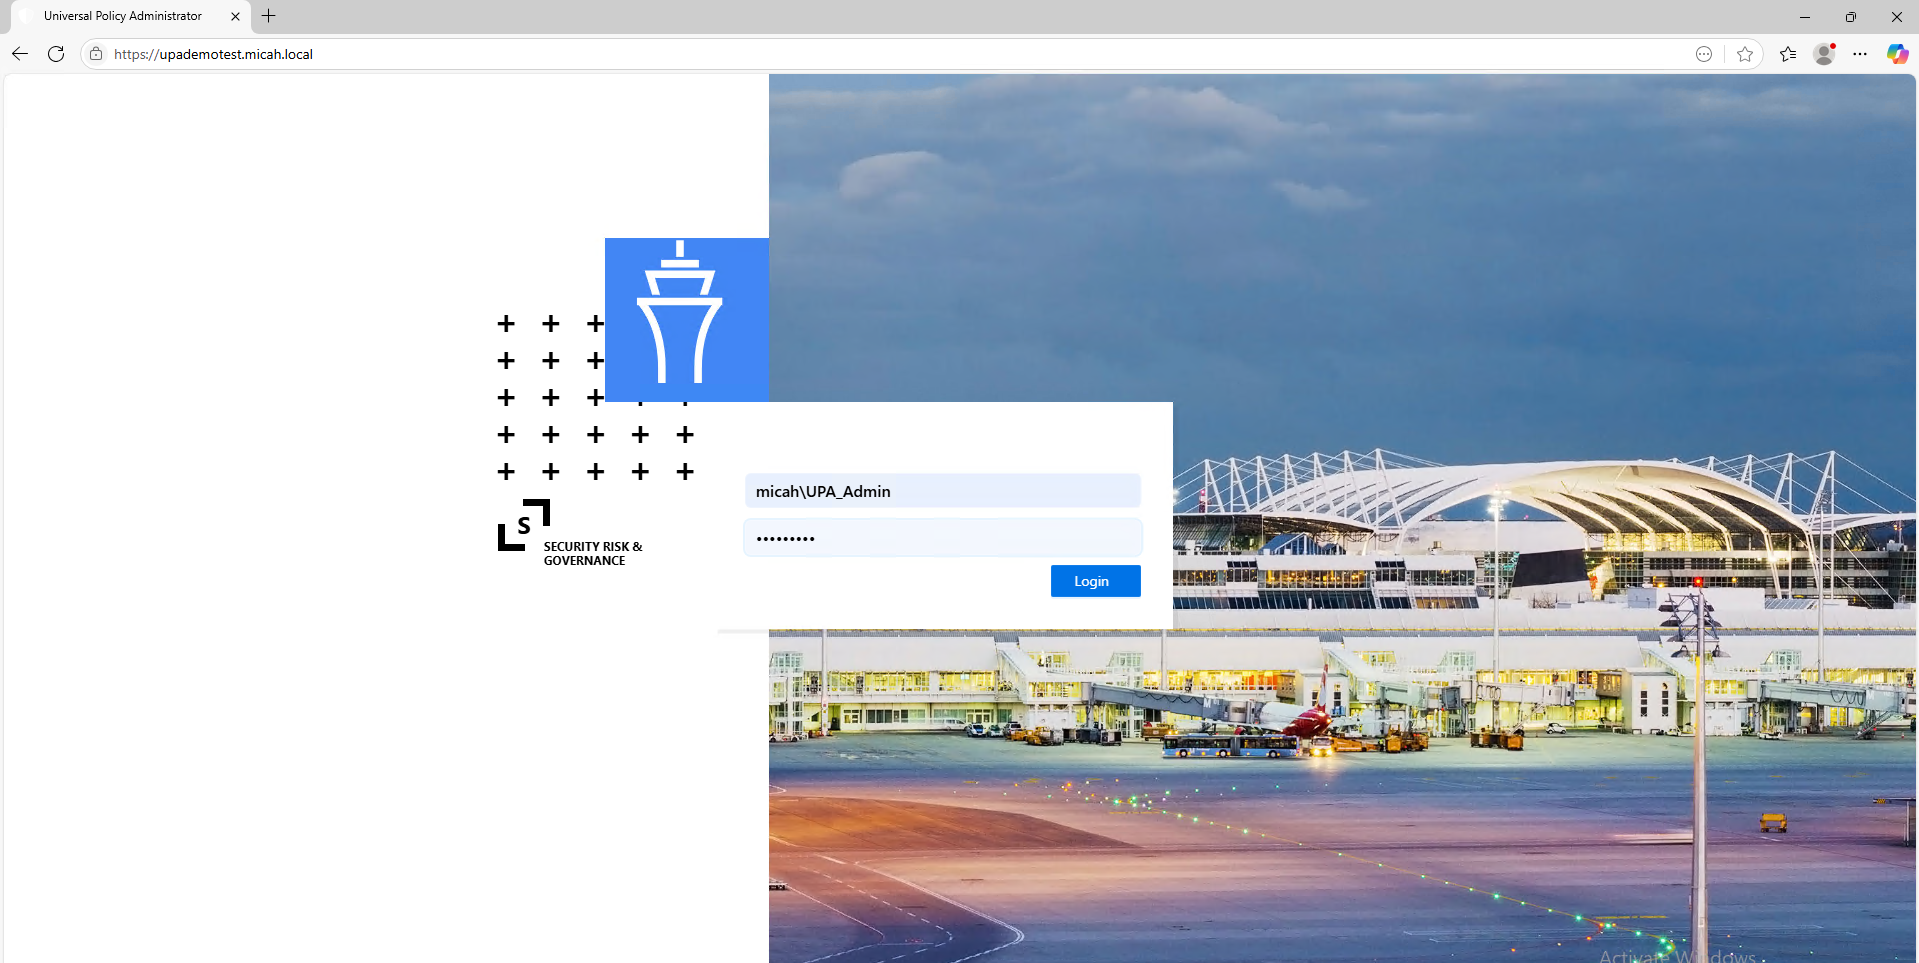
First Login as UPA_Admin
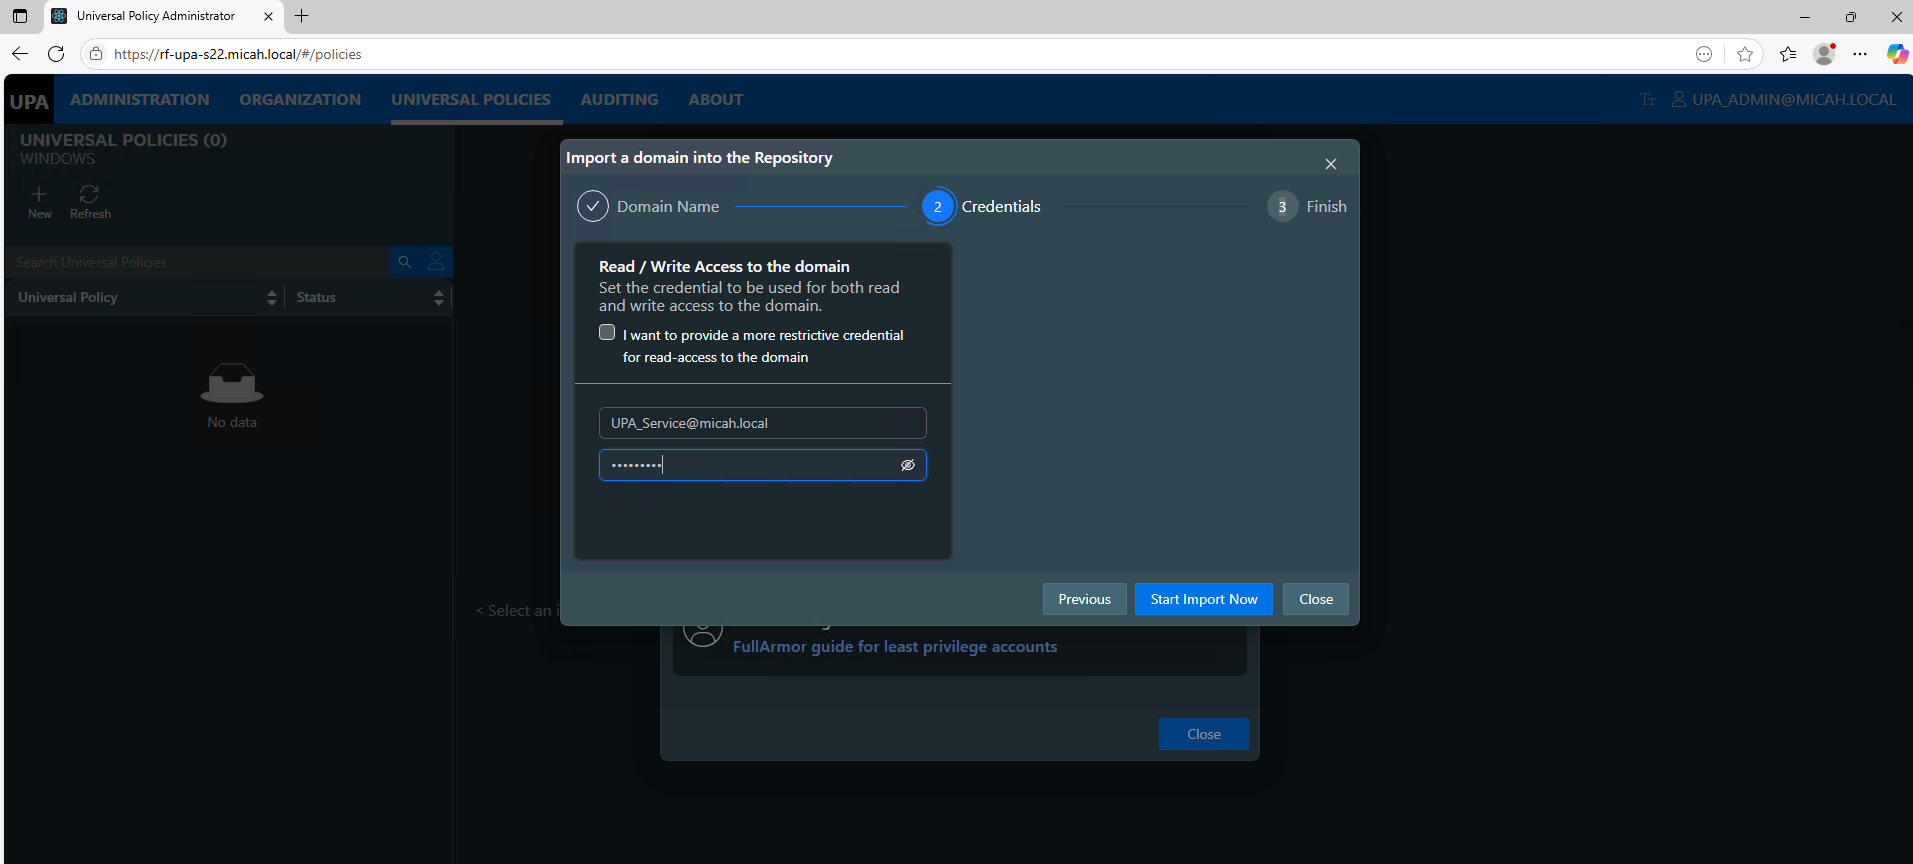
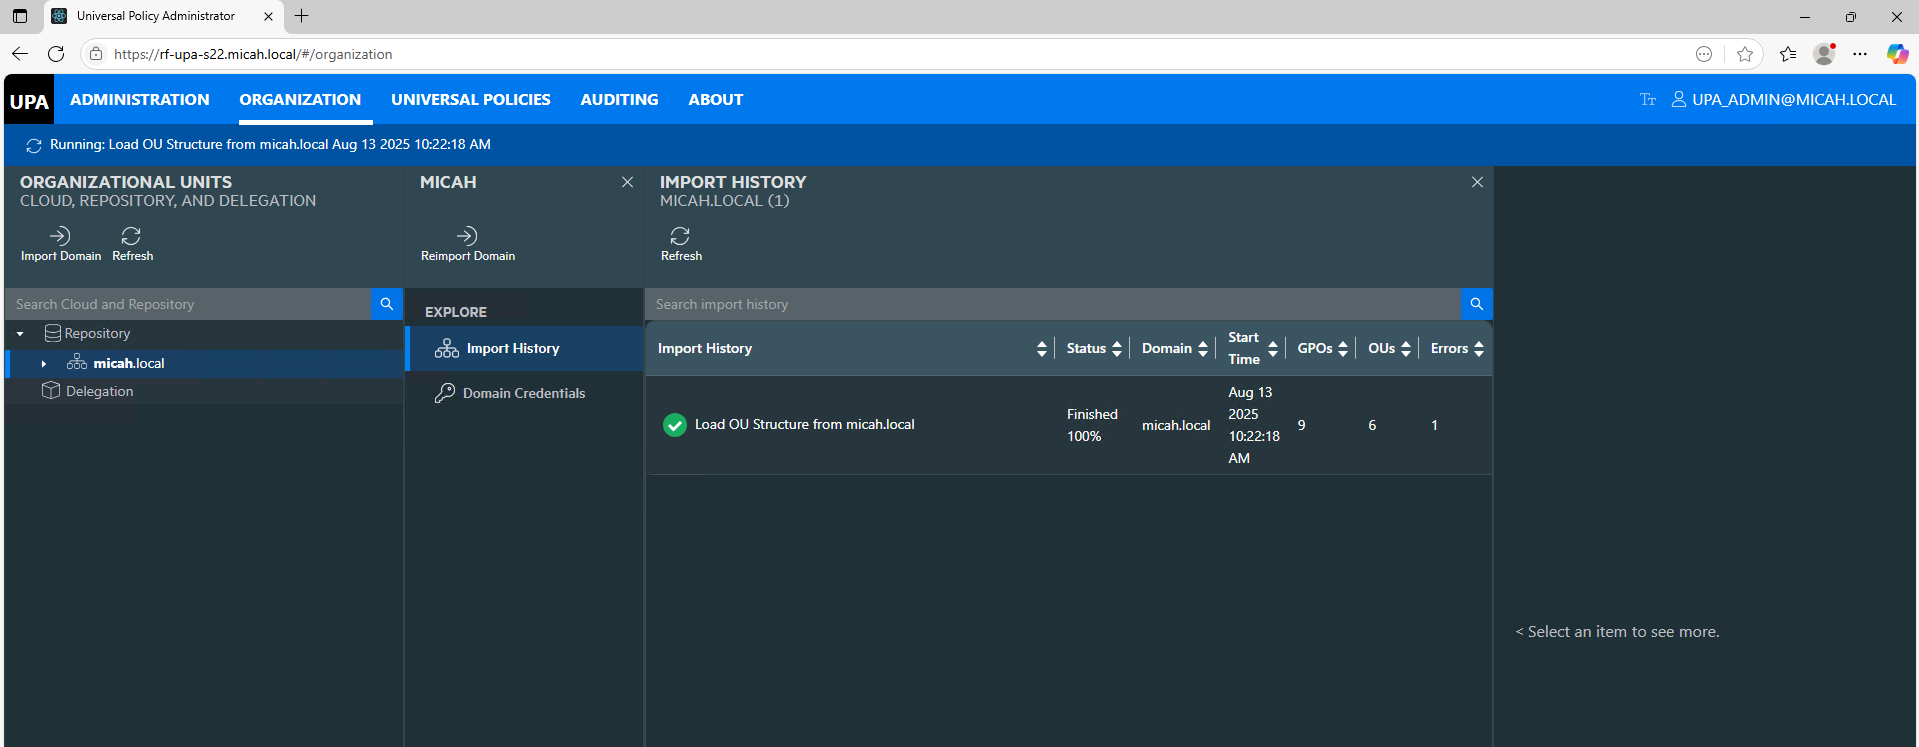
Importing the Domain as UPA_Service
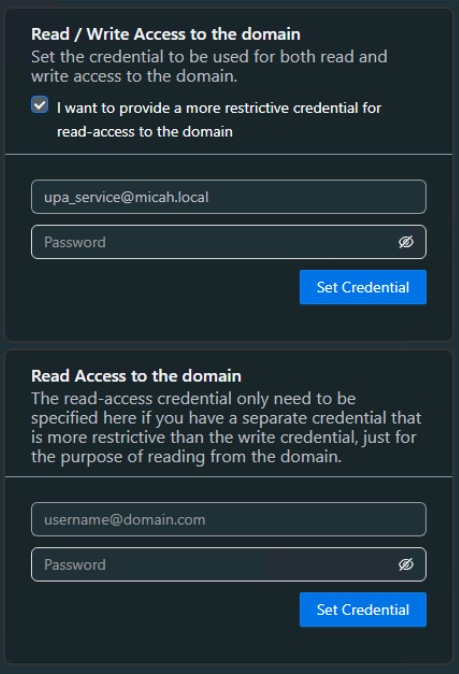
Optional Read/Write Permissions to the Domain
For more restrictive LPA permissions, you can separate the read/write access to the domain as shown below.
Check status of Import here:
** Important Note **
The UPA Application Runtime Service Account (e.g., UPA_Service) has limited permissions—it cannot overwrite any Active Directory Group Policy Objects (GPOs) that it did not originally create.
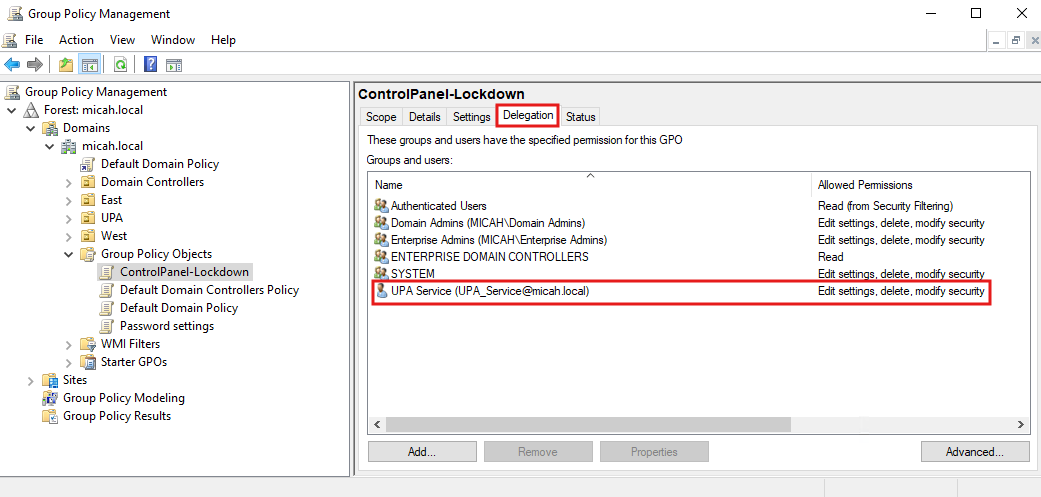
As a result, you must delegate the appropriate permissions to it in the Delegation tab for each pre-existing GPO using the Group Policy Management Console (GPMC).
To automate this process of adding the Service account (e.g., UPA_Service) to have permissions to operate on existing GPOs, we have a PowerShell script which will add the Service to the Delegation section of the GPOs.
Please note: To run the script and update the GPOs, you must have Modify Security rights on the GPOs or be a Domain Admin.
PowerShell script:
# Prompt for domain and account
$delegatedUser = Read-Host "Enter the domain\account to delegate permissions to (e.g., micah\UPA_Service)"
# Define the GPO permissions to be granted
$permissionType = "FullControl" # Choose permissions: "Read", "Edit", "FullControl"
# Validate input
if ([string]::IsNullOrWhiteSpace($delegatedUser)) {
 Write-Host "Error: Domain\account cannot be empty." -ForegroundColor Red
 exit 1
}
if (-not $delegatedUser.Contains('\')) {
 Write-Host "Error: Please specify the account in domain\account format (e.g., micah\UPA_Service)" -ForegroundColor Red
 exit 1
}
Write-Host "Delegating $permissionType permissions to: $delegatedUser" -ForegroundColor Green
# Load GroupPolicy module if not already loaded
Import-Module GroupPolicy
# Get all GPOs in the domain
$gpos = Get-GPO -All
# Loop through each GPO and apply the delegation
foreach ($gpo in $gpos) {
 # Get the current GPO permissions
 $gpoName = $gpo.DisplayName
 Write-Host "Adding permissions for $gpoName..."
 # Use the Add-GPPermissions cmdlet to delegate permissions
 try {
 # Delegating permissions based on chosen type
 if ($permissionType -eq "Read") {
 Set-GPPermission -Name $gpoName -TargetName $delegatedUser -TargetType User -PermissionLevel GpoRead
 }
 elseif ($permissionType -eq "Edit") {
 Set-GPPermission -Name $gpoName -TargetName $delegatedUser -TargetType User -PermissionLevel GpoEdit
 }
 elseif ($permissionType -eq "FullControl") {
 Set-GPPermission -Name $gpoName -TargetName $delegatedUser -TargetType User -PermissionLevel GpoEditDeleteModifySecurity
 }
 else {
 Write-Host "Invalid permission type. Please use 'Read', 'Edit', or 'FullControl'." -ForegroundColor Red
 break
 }
 Write-Host "Permissions granted for $gpoName" -ForegroundColor Green
 } catch {
 Write-Host "Failed to set permissions for $gpoName. Error: $_" -ForegroundColor Red
 }
}
Write-Host "GPO delegation process completed." -ForegroundColor Yellow