
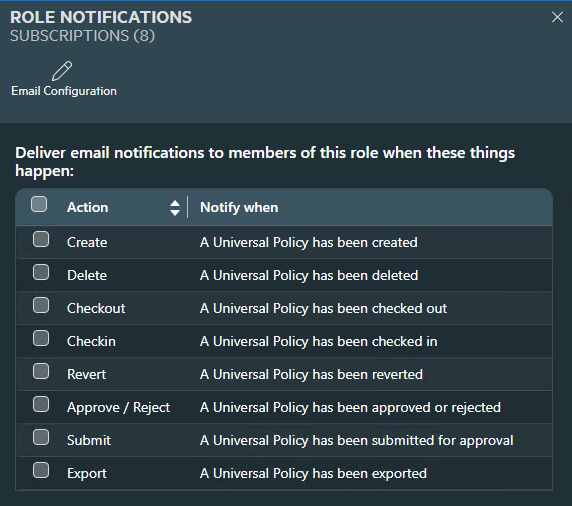
Setting up Role Email Notifications
For each Role, you can setup Notifications where the user is notified by email on specific actions performed in UPA.
The available Notifications are:
- Create
- Delete
- Checkout
- Checkin
- Revert
- Approve/Reject
- Submit
- Export
To configure your email server to receive the email notifications, click on the Email Configuration and fill in the fields for your email server. You can confirm it’s working by doing a Test email.
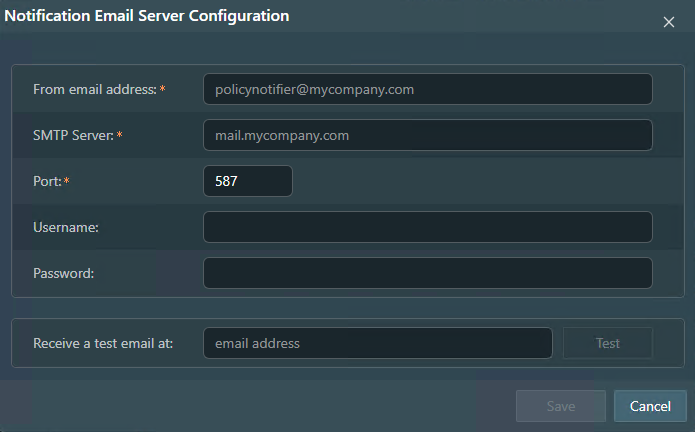
Notification Email Server Configuration Instructions
To enable email notifications, fill out the fields in this window as follows:
- From email address:
Enter the email address that will appear as the “sender” of the notification emails.
Example: policynotifier@mycompany.com
Important: This email address must be valid and allowed to send through your mail server. If you use an external provider (like Microsoft 365 or Google Workspace), make sure this address exists and is authorized to send email.
- SMTP Server:
Enter the hostname or IP address of your organization’s SMTP mail server.
Example: mail.mycompany.com - Port:
Specify the SMTP port number.- Use 587 for TLS (recommended).
- Use 465 for SSL, or 25 if your mail server supports unauthenticated relay (less common).
If unsure, confirm the correct port with your IT or email administrator.
- Username:
Provide the username of the email account that will be used to send notifications.
This is usually the full email address (e.g., policynotifier@mycompany.com). - Password:
Enter the password for the email account above.
For security, use an app-specific password if your mail provider supports it.
- Receive a test email at:
Enter your own email address (or a distribution list) to receive a test message.
Click Test to confirm that the settings are working correctly before saving.
Please check your spam/junk folders if you do not see the Test email. - Save:
Once the test email is successfully received, click Save to apply the configuration.