Universal Policy Administrator Documentation
-
Introduction to Universal Policy Administrator
-
Installing Universal Policy Administrator
-
Setting up UPA Delegation
-
Working with Universal Policies
- Intro to Working with Universal Policies
- Creating Universal Policies
- Adding and Editing Policies
- Approving Universal Policies
- Exporting Universal Policies and Updating OU Links
- Merging Policies
- Rolling Back Policies
- Replicating Policies
- Synchronizing Policies (Gold Policy)
- Managing Security Filtering
- Working with ADMX Templates
-
Working with Domains and OUs
-
Reporting on Universal Policies
-
UPA Configuration Settings
- Configuring SAML Authentication via Microsoft ENTRA ID
- Configuring UPA to use a Third-Party Identity Provider
- Configuring OIDC Authentication with OKTA
- Configuring OIDC Authentication with Microsoft Entra ID
- Configuring SAML authentication with Okta
- Configuring the Universal Policy Administrator Syslog Provider
-
Appendix
< All Topics
Print
Change UPA Logging Level
Change UPA Logging Level to Info (more verbose)
- On the machine where UPA is installed, go to:
C:\Program Files\FullArmor\AD Bridge\Gateway\WebApp - Open the Web.config file
- In the <appSettings> section, find:
<add key=”LoggingLevel” value=”Warning”/> - Change “Warning” to “Info” so it now looks like:
<add key=”LoggingLevel” value=”Info”/> - Save the web.config file
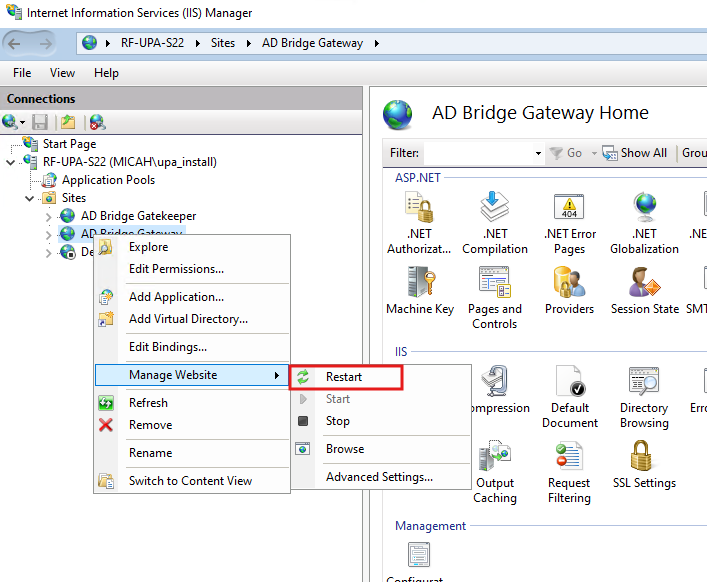
- After making the change, the UPA service in IIS needs to be restarted. It will be in IIS Sites, AD Bridge Gateway as shown below.
The log file is located at:
C:\ProgramData\FullArmor\AD Bridge\Logs\GatewayLog.txt

In This Article
