
SSHepherd Documentation
Creating an RDP Session
Overview
SSHepherd® can connect to Hosts from both a graphical Control App and a Command-Line Interface (CLI). Connections can be made from Windows, Linux, and MacOS.
Configuring an RDP session using the SSHepherd® Control App
RDP sessions can be made from the SSHepherd® Control App on Windows and MacOS. We are using Windows in this example.
- Launch the SSHepherd® Control App.
- At the SSHepherd login screen, enter the name of the SSHepherd® C3 Server and your Username (email address) and Password

- If this is your first time configuring your tunnels, click Begin on the Welcome screen.
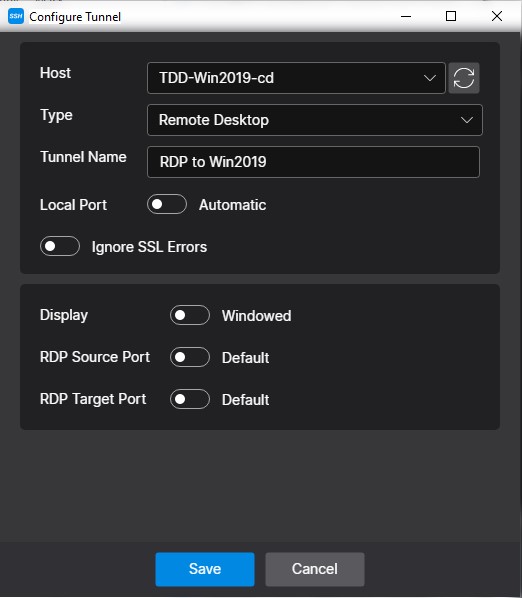
- Select a Host. This field contains a list of all Hosts you have been granted access to.
- Select the Type. This field is the connection type for the session. Choose Remote Desktop from the list.
- Tunnel Name. This field allows you to give the tunnel a descriptive name.
- Local Port. By default, this option is set to ‘Automatic’ and will select a random port for you. The other option allows you to manually set a port for this tunnel.
- Ignore SSL Errors. By default, this option will not ignore SSL Errors. This option should only be used in evaluation and test environments, not for production use.
- Display. By default, the RDP Session will launch in a Window. The other option is to have the RDP session launch in Full Screen.
- RDP Source Port. This option allows you to specify a specific RDP Source Port, or leave it as Default.
- RDP Target Port. This option allows you to specify a specific RDP Target Port, or leave it as Default.
- Click Save to create your configured tunnel.
- Click the Toggle switch to launch an RDP session to your Windows Server Host.

- When you disconnect the RDP session, the RDP Session will end, and the SSHepherd® tunnel will automatically close.
Creating an RDP session using the SSHepherd® Control CLI
The SSHepherd® Control CLI tool (shepctl) works across Windows, Linux and MacOS.
- Open a Terminal or Command Prompt, and type the following to login to your SSHepherd® server.
shepctl --url https://your.sshepherd.server login
- When prompted, enter your login credentials.
Alternately, to confirm you are logged in, type:
shepctl whoami
- Now that you are logged in, the following command will return a list of the Hosts you are able to access. You will need to take note of the hostname for the server you want to establish an RDP connection to.
shepctl list-host
- Run this command to establish an RDP session (where ‘WinSvr2022’ is the hostname):
shepctl --hostname WinSvr2022 mstsc-tunnel