
Creating an SSH session
Applies to SSHepherd 2.0
Overview
SSHepherd® opens SSH sessions to Linux and Windows hosts without an open SSH port. You can connect from the Control App or from shepctl on Windows and Linux. shepctl uses your computer’s own ssh client, so your usual SSH keys and options still work.
Before you start:
- The host has the SSHepherd® Agent installed and registered. Windows Server 2016 doesn’t support SSH sessions.
- You and the host are in the same group, or your administrator has given you an SSH tunnel definition.
- You have an account on the host, with a password or an SSH key.
Using the Control App
Open a tunnel your administrator created
- Start the SSHepherd® Control App and sign in.
- Switch on the SSH tunnel. A terminal opens and runs ssh to the host through the tunnel. The first time, ssh asks you to confirm the host’s key.
- Sign in to the host if prompted. Definitions created in the Administrator Console don’t include an SSH user, so ssh signs in with your local user name.
- When you exit the SSH session, the tunnel closes.
Create your own SSH tunnel
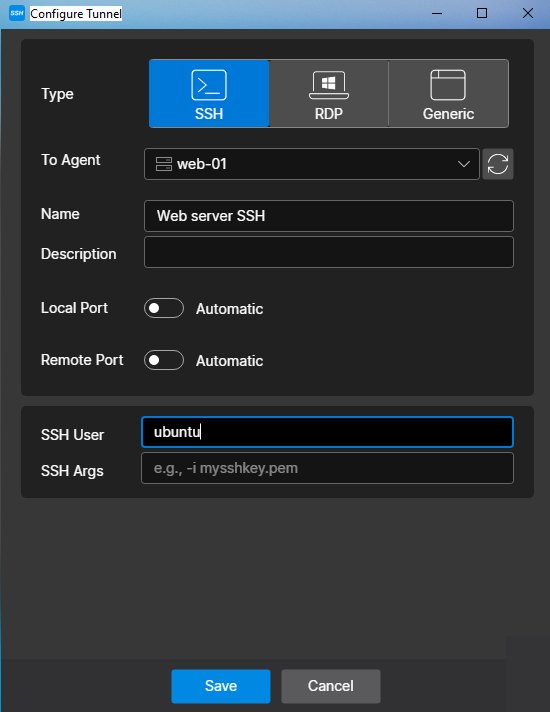
- Start the SSHepherd® Control App and sign in.
- Click + to create a tunnel.
- Choose the SSH type.
- In To Agent, select the host.
- Enter a Name for the tunnel.
- Leave Local Port on Automatic, or choose a specific port.
- In SSH User, enter the account you use on the host.
- Optionally, in SSH Args, enter extra ssh options, such as
-i ~/.ssh/id_ed25519to use a key. - Click Save.
- Switch on the tunnel. A terminal opens and connects. Enter your password if prompted.
When you exit the SSH session, the tunnel closes.
Using shepctl
- Sign in to your C3 server:
shepctl --url https://your.sshepherd.server login - List the hosts you can reach, and note the host name or host ID:
shepctl list-host - Start the SSH session:
shepctl --hostname <host name> --sshuser <your ssh user> ssh-tunnelExample with a user name and password:shepctl --hostname web01 --sshuser ubuntu ssh-tunnelExample with an SSH key:shepctl --hostname web01 --sshuser ubuntu --sshargs "-i ~/.ssh/web01.pem" ssh-tunnel
When you exit the SSH session, the tunnel closes.
Run a single command
Use --sshcmd to run one command on the host and return:
shepctl --hostname web01 --sshuser ubuntu --sshargs "-i ~/.ssh/web01.pem" --sshcmd "uptime" ssh-tunnelNote: shepctl returns exit code 0 even when the remote command fails. In scripts, check the command’s output rather than shepctl’s exit code.
If session recording is on for a Linux host, wrap commands that use ;, | or && in sh -c. See Session Recording.
Options
| Option | Use |
|---|---|
--sshuser <user> | The account on the host. |
--sshargs "<options>" | Extra options for the ssh client, such as -i <key file>. |
--sshcmd "<command>" | A command to run instead of an interactive shell. |
--sshnohostkey | Don’t check the host key. |
--sshdisableoldalgo <value> | Turn off older SSH algorithms (diffie-hellman-group1-sha1, ecdh-sha2-nistp256). |
--port <port> | Use a fixed local port. |
Copy files with SCP
Use scp-tunnel with --scpsrc (source) and --scptgt (target). Write the remote side as <user>@localhost:<path>; shepctl connects localhost to the host through the tunnel.
Copy a file to the host:
shepctl --hostname web01 --sshuser ubuntu --sshargs "-i ~/.ssh/web01.pem" --scpsrc ./report.txt --scptgt ubuntu@localhost:/tmp/report.txt scp-tunnelCopy a file from the host:
shepctl --hostname web01 --sshuser ubuntu --sshargs "-i ~/.ssh/web01.pem" --scpsrc ubuntu@localhost:/var/log/syslog --scptgt ./syslog scp-tunnelSSH to Windows hosts
The Agent installs or uses Windows OpenSSH Server on Windows hosts, so you can SSH to Windows Server 2019 and 2022, and Windows 10 and 11. Windows Server 2016 doesn’t include OpenSSH, so SSH to it isn’t available.
Note: SSH sessions to a Windows host fail while session recording is on for that host. Turn recording off on Windows hosts that you reach by SSH. See Session Recording.