
Managing Roles
Applies to SSHepherd 2.0
Overview
A role is a set of permissions. Every user gets the permissions of all the roles they hold.
Roles control what users can do, such as create users or view recordings. Groups control which agents a user can reach. A user normally needs both: a role that lets them open tunnels, and membership of a group that contains the agent. See Creating Users and Groups.
SSHepherd® 2.0 has two built-in roles, and you can create your own.
| Built-in role | Who it’s for | Permissions |
|---|---|---|
| admin | Administrators | 32 permissions: everything except the two personal permissions held by user. Admins can reach all agents. |
| user | Everyone | list-host, create-tunnel, manage-personal-tunnel-definition and user-security-token-expiration |
- The first account created when the C3 server is installed holds both admin and user.
- Every new user gets the user role automatically.
- The admin role can’t be edited or deleted.
You can manage roles in the Administrator Console or with shepctl.
Video: Locked-down end users with roles and tunnel definitions · 2:51
Permissions
The Create Role dialog groups the 34 permissions as follows.
Agents
| Permission | Allows |
|---|---|
add-host | Register an agent (shepagent register). |
list-host | List the agents in the user’s groups. |
list-all-agents | See all agents, not just those in the user’s groups. |
view-agent-config | View agent settings. |
modify-agent-config | Change agent settings, such as Allowed Ports, recording and availability. |
remove-host | Remove an agent. |
Groups
| Permission | Allows |
|---|---|
create-group | Create a group. |
list-group | List all groups. |
modify-group | Add and remove group members, and delete groups. |
Roles
| Permission | Allows |
|---|---|
create-role | Create a role. |
modify-role | Change a role’s permissions. |
list-user-role | See which users hold which roles. |
modify-user-role | Give roles to users and take them away. |
Sessions
| Permission | Allows |
|---|---|
list-recording | See all sessions and play back recordings. |
attach-recording | Watch a session while it’s running. |
terminate-tunnel | End another user’s session. |
Tunnels
| Permission | Allows |
|---|---|
create-tunnel | Open tunnels to agents in the user’s groups, and tunnels assigned to the user. |
create-admin-tunnel | Open tunnels to any agent, not just those in the user’s groups, including other users’ tunnel definitions by ID. |
connect-admin-isolated-tunnel | Connect to an agent whose availability is Isolated with Admin Access. See Agent Isolation. |
create-tunnel-definition | Create tunnel definitions for any user. |
manage-tunnel-definition | Edit or delete any user’s tunnel definitions. |
list-all-tunnel-definitions | See all tunnel definitions on the Tunnels page of the Administrator Console. The Control App and shepctl still show only the user’s own definitions. |
manage-personal-tunnel-definition | Create, change and delete the user’s own tunnel definitions. |
Users
| Permission | Allows |
|---|---|
create-user | Create users. |
list-user | List all users. |
remove-user | Delete users. |
Other
| Permission | Allows |
|---|---|
create-api-key | Create API keys. |
list-api-key | List API keys. |
remove-api-key | Delete API keys. |
manage-license | View and change the license. |
manage-sso-config | Change the SAML, OIDC and AD settings. |
manage-kubernetes | Change Settings → General. |
admin-security-token-expiration | User receives security_token_expire_admin token expiration setting, if set |
user-security-token-expiration | [User receives security_token_expire_user token expiration setting, if set |
Some permissions depend on others. When you select one in the console, it also selects what it needs; for example, Create Role also selects List User Role, and Modify Agent Config selects View Agent Config. To end other users’ sessions from shepctl, a role needs both terminate-tunnel and list-recording.
Note: You can give a role, or add a permission to a role, only if you hold every permission involved yourself.
Using the Administrator Console
Create a role
- Click Roles.
- Click +.
- Enter a name for the role.
- Select the permissions the role should have.
- Click Create.
Create is available once the role has a name and at least one permission. Use a name that isn’t already used, ignoring capitals, and don’t start or end it with a space. You can’t name a role “admin”.
Note: In 2.0, saving a custom role that includes Create Tunnel or Create Admin Tunnel fails in the console: the dialog closes and the role isn’t saved. To give users tunnel access, use the built-in user role.
Change a role’s permissions
- On the Roles page, select the role.
- Click the edit (pencil) icon.
- Select or clear permissions.
- Click Save.
Important: Don’t change the name in the edit dialog. Roles can’t be renamed, and changing the name applies your changes to the role with the new name, if one exists.
The changes apply to the role’s users straight away.
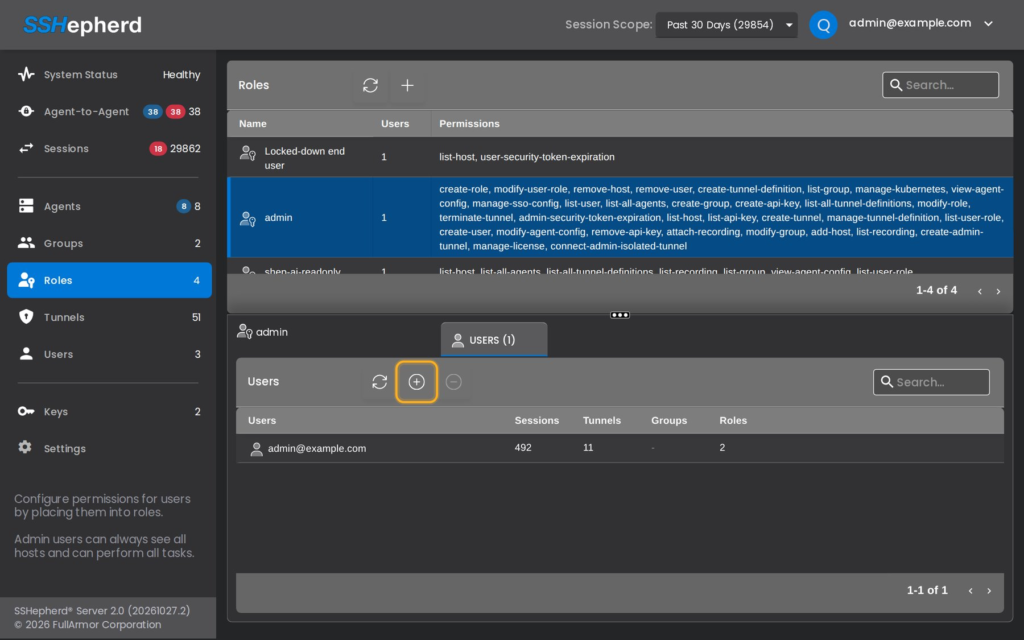
Give a role to users
- On the Roles page, select the role.
- In the panel below, click the Users tab.
- Click Include User.
- Select the users and click Include.
Take a role away from users
- Select the role, then click the Users tab.
- Select the user and click Exclude.
- Confirm.
Delete a role
Important: Before you delete a role, remove all its users (see above). Deleting a role that users still hold leaves those users unable to sign in or run any command.
- Select the role and check that its Users tab is empty.
- Click the delete (trash) icon.
- Confirm.
Don’t delete or edit the built-in user role: every account holds it.
Using shepctl
Sign in with an account that can manage roles.
To list roles and their permissions:
shepctl list-roleTo see the roles a user holds:
shepctl --user jane.doe@example.com list-user-roleTo give a role to a user:
shepctl --role admin --user jane.doe@example.com role-addTo take a role away from a user:
shepctl --role admin --user jane.doe@example.com role-delshepctl can’t create or delete roles; use the console for that.
Good practice
- Give each administrator only the permissions their job needs. For example, a help desk role might have
create-user,list-user,list-groupandmodify-group. - Keep at least two accounts with the admin role, so you aren’t locked out if one is lost.
- Review role membership when people change jobs or leave.