
Configure a 3rd-Party Identity Provider
Applies to SSHepherd 2.0
SSHepherd® can sign users in with these identity providers:
- SAML
- OIDC
- Active Directory
With SAML or OIDC, SSHepherd® also supports SCIM provisioning, which creates users, groups and group memberships from your identity provider.
Important: keep a way back in. If you can’t sign in after you switch to a third-party identity provider, add
/#/signin?auth=standardto your C3 server URL. This bypasses the identity provider and lets you sign in with a local SSHepherd® administrator account:https://your.sshepherd.server/#/signin?auth=standardWith shepctl, add
--userwith a local account to bypass the identity provider:shepctl --url https://your.sshepherd.server --user admin@example.com login
Summary of steps
- Install the C3 server with its built-in identity provider, including the first local administrator account.
- For SAML or OIDC, set up an SSHepherd® application in your identity provider, and optionally SCIM.
- Sign in to the C3 server, enter the provider’s details on its tab in Settings, and select it as the active authentication mode.
- When accounts have been provisioned, give administrator access to the right ones.
Step 1: Install the C3 server
Follow Installing the C3 Server. When the server is installed and you’ve created the first local administrator account, continue to step 2.
Step 2: Configure the SAML or OIDC identity provider
For Microsoft Entra, see the appendices at the end of this page.
- Create an application for SSHepherd® in your identity provider’s console.
- If your provider requires it, give users or groups permission to use the application.
- Configure the application with the settings below.
SAML settings for the identity provider
- Entity ID:
https://your.sshepherd.server/saml/metadata - Single sign-on (SSO) URL:
https://your.sshepherd.server/saml/acs - Name ID format: EmailAddress (recommended)
- Logout URL:
https://your.sshepherd.server/saml/sls
Your identity provider must also:
- Sign its assertions.
- Send an
email_verifiedattribute. Without it, sign-in fails with HTTP 403. - Not send duplicate attribute names.
Note these values from your identity provider. You need them in step 3:
- Entity ID
- Login URL
- Logout URL
- Signing certificate (Base64)
OIDC settings for the identity provider
- Redirect URI:
https://your.sshepherd.server/oidc/cb - Set the claim type to token.
Note these values from your identity provider:
- Provider URL
- Client ID
- Client secret
Step 3: Configure SSHepherd® to use the identity provider
- Sign in to the Administrator Console at
https://your.sshepherd.serverwith the local administrator account you created during installation. - Click Settings.
- Click the tab for your provider (SAML, OIDC or AD) and enter the settings below.
- In Active Authentication Mode, select the provider.
- Click Save.
Important:
- One Save stores the SAML, OIDC and AD tabs and the active mode together. Check every tab before you save.
- The console doesn’t test the values you enter. A wrong URL or certificate shows up only when users try to sign in, so test sign-in in a private browser window before you sign out of your administrator session.
- Unsaved changes are lost if you switch tabs. Save before moving to another tab.
To manage these settings without full admin rights, a user needs a role with the manage-sso-config permission.
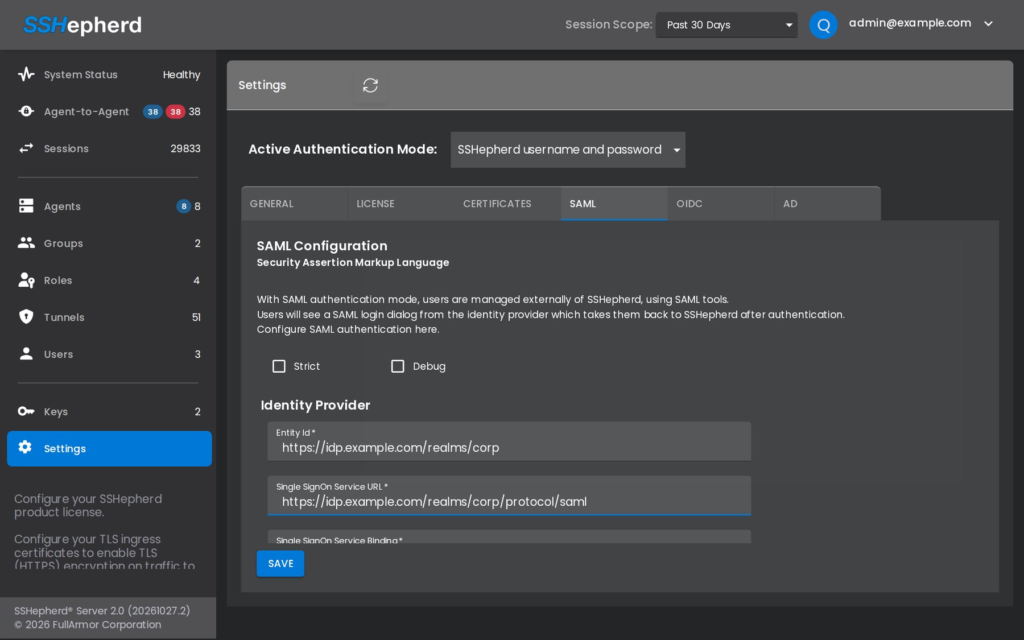
SAML authentication settings
- Entity Id: the entity ID from your identity provider.
- Single SignOn Service URL: the login URL from your identity provider.
- Single Logout Service URL: the logout URL from your identity provider.
- x509cert: the Base64 certificate from your identity provider.
- Technical and Support Contact: a name and email address are required for both.
- Strict, signed assertions and signed messages: we recommend turning on Strict and requiring signed assertions in production.
OIDC authentication settings
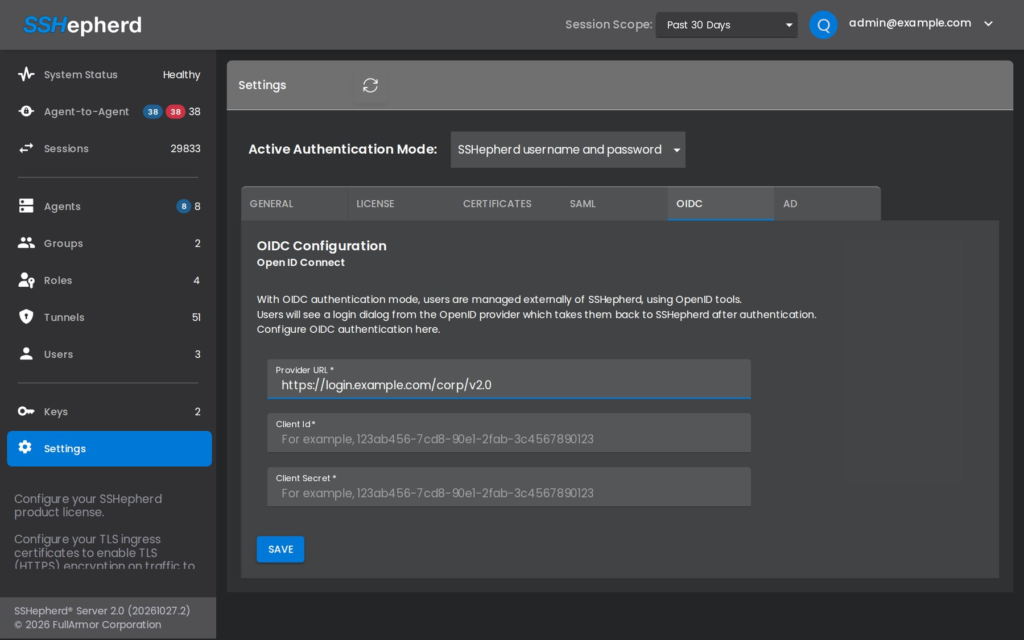
- Provider URL: the URL from your identity provider.
- Client Id: the client ID from your identity provider.
- Client Secret: the client secret from your identity provider.
Active Directory authentication settings
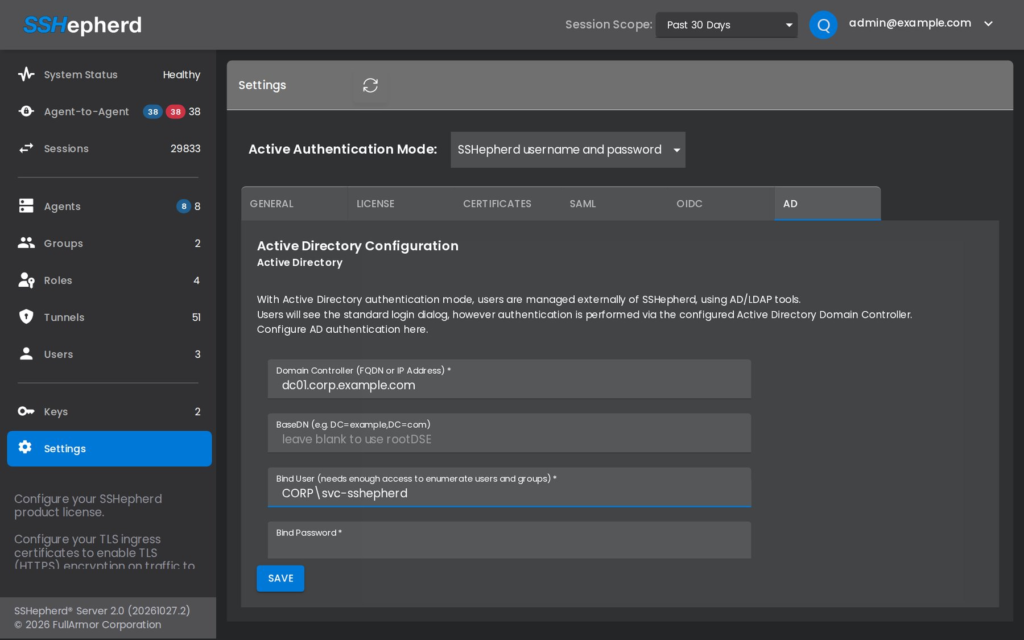
- Domain Controller: the FQDN or IP address of your domain controller.
- Bind User: a domain user that can list users and groups.
- Bind Password: the Bind User’s password.
Step 4: Give the admin role to administrator accounts
Wait for the first provisioning cycle to finish. With Active Directory, the C3 server provisions accounts itself. With SAML or OIDC, you need SCIM provisioning (see below); you can check its status in your identity provider’s portal.
When the accounts have been provisioned, give the admin role to your administrators:
- In the Administrator Console, click Roles.
- Select the admin role.
- In the panel below, click Include User, and select the accounts.
- Click Include.
Signing out with SAML
Signing out of SSHepherd® ends only the SSHepherd® session. It doesn’t sign the user out of the identity provider. Users on shared computers should also sign out of the identity provider.
Optional: configure SCIM provisioning
In your identity provider’s provisioning settings, enter:
- SCIM endpoint:
https://your.sshepherd.server/scim/v2/ - Authentication or secret token: a SCIM Integration key from the Administrator Console.
To create the key:
- Sign in to the Administrator Console.
- Click Keys.
- Click +.
- Tick SCIM Integration only, and enter a description.
- Click Generate Key.
- Copy the key and store it securely. It can’t be shown again; if you lose it, create a new key.
See API Keys.
Appendix A: Configure SAML with Microsoft Entra
Create and configure an Entra enterprise application
- In the Entra admin center, go to Enterprise applications and select New application, then Create your own application.
- Name the application and select Integrate any other application you don’t find in the gallery (Non-gallery).
- Click Create.
- Assign users and groups to the application.
- In the application, go to Single sign-on and select SAML.
- Set:
- Identifier:
https://your.sshepherd.server/saml/metadata/ - Reply URL:
https://your.sshepherd.server/saml/acs - Sign on URL:
https://your.sshepherd.server/saml/acs - Relay State: leave blank.
- Logout URL:
https://your.sshepherd.server/saml/sls
- Identifier:
- Under SAML Certificates, download Certificate (Base64).
- Under Set up, copy the Login URL, Microsoft Entra Identifier and Logout URL.
- In SSHepherd®, enter the Login URL as the Single SignOn Service URL, the Logout URL as the Single Logout Service URL, the Microsoft Entra Identifier as the Entity Id, and the certificate as x509cert.
Set up SCIM provisioning
- In the SSHepherd® Administrator Console, create a SCIM Integration key (see above).
- In Entra, open the application’s Provisioning tab and set Provisioning Mode to Automatic.
- Under Admin Credentials, set Tenant URL to
https://your.sshepherd.server/scim/v2/. - Paste the SCIM key into Secret Token.
- Click Save.
- Click Start provisioning.
Appendix B: Configure OIDC with Microsoft Entra
Create and configure an Entra enterprise application
- In the Entra admin center, go to Enterprise applications and create a non-gallery application, as in Appendix A.
- Assign users and groups to the application.
- Go to App registrations and select the application.
- Under Authentication, select Add a platform and add Web.
- Set Redirect URI to
https://your.sshepherd.server/oidc/cb. - Under Certificates & secrets, select New client secret and create a secret. Copy its value straight away. In SSHepherd®, use the application’s client ID as Client Id and the secret’s value as Client Secret.
- Select Endpoints and copy the URL under OpenID Connect metadata document. Use it as the Provider URL in SSHepherd®.
Set up SCIM provisioning
Follow the SCIM steps in Appendix A.