
Installing the Command-and-Control (C3) Server
Applies to SSHepherd 2.0
Summary
The Command-and-Control (C3) server is the heart of SSHepherd®. Agents and Control App users both connect to it, and, like an old telephone operator, the C3 server connects each user’s socket to the right Agent’s socket.
The C3 server manages access, routing and session requests. It also stores live and recorded sessions and lets administrators watch and end sessions.
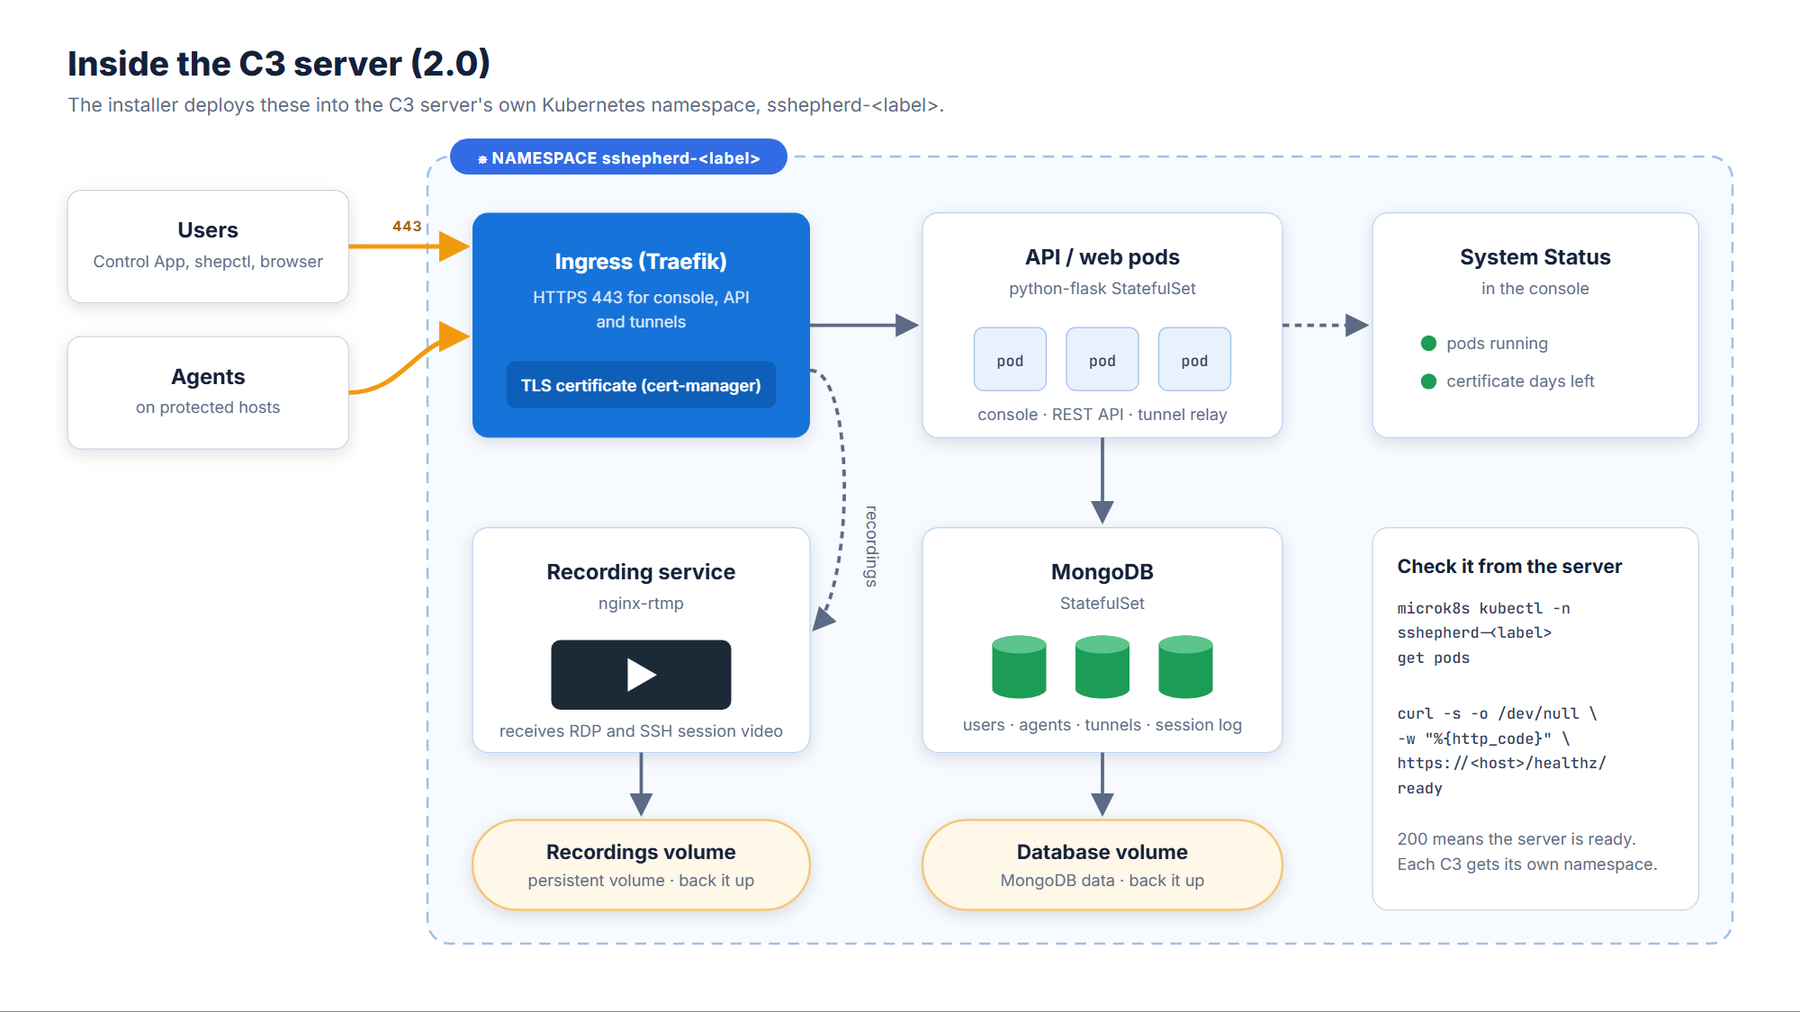
The C3 server runs in a Kubernetes (k8s) cluster, so it can scale up and down as needed. It’s made up of:
- Web and API pods (the
python-flaskStatefulSet, three replicas). They host the Administrator Console and route data between sockets. - A MongoDB database. Stores users, groups, roles, agents, tunnels and session information.
- The recording service (
nginx-rtmp). Receives, saves and plays back RDP recordings. It runs in its own namespace,sshepherd-ingress-rtmp, and is shared by all C3 servers on the cluster. - A persistent volume (
recording-storage). Stores recordings. - An ingress controller. Routes traffic to the right pods. On MicroK8s this is Traefik; on Azure AKS each C3 server gets its own NGINX ingress controller.
Each C3 server is installed in its own namespace, named sshepherd- followed by the first part of the server’s host name. For example, c3.example.com is installed in sshepherd-c3. Use this namespace in every kubectl command for your server. The installer refuses to install into a namespace that already exists.
Important: It’s possible to run MongoDB outside Kubernetes, as a stand-alone or managed database. The install scripts can’t do this, because they always create a new MongoDB inside the cluster.
Before You Start
The C3 server can be installed on most Kubernetes platforms. This page covers MicroK8s and Microsoft Azure AKS. Installing on other platforms may need more Kubernetes knowledge than this guide covers.
FullArmor will provide:
- An SSHepherd® license.
- Container registry credentials, for installing the C3 server.
- Repository credentials, for installing the Linux Agent and shepctl.
- Download links for the server bundle and the Windows installer.
If you haven’t received these, contact your sales representative.
You will also need:
- A DNS entry for the C3 server’s host name, for example
c3.example.com. The host name must contain a subdomain. - A TLS certificate, unless you use Let’s Encrypt. You need PEM versions of the certificate and an unencrypted key. See Creating the C3 Server SSL Certificate.
- A mail server or SendGrid account if you want password reset or bulk user creation. You set this up after installation. See Configuring C3 Settings.
Check the System Requirements before you begin.
Installing on MicroK8s
MicroK8s is a lightweight Kubernetes distribution. The easiest way to install it is with snap on Ubuntu or another Linux system that supports snaps (https://microk8s.io/docs/getting-started).
The server bundle, shepserver-microk8s-install-<build>.tar, contains:
| File | Purpose |
|---|---|
README-microk8s | Quick instructions for the install script. |
shepserver-microk8s.sh | Installs all the C3 components. Run it on the MicroK8s machine. |
create-first-user.sh | Creates the first administrator. The install script runs it for you. |
microk8s-cluster-init.sh | Helps set up a multi-node MicroK8s cluster. |
sshepherd.yaml, rbac.yaml | The C3 server’s Kubernetes objects, roles and policy. |
sshepherd_rtmp.yaml, nginx-rtmp-config.sh | The recording service and its configuration. |
pvc-microk8s.yaml, pvc-longhorn.yaml | The recordings volume, for single-node and multi-node clusters. |
microk8s_ingress.yaml, microk8s-ingress-patch.yaml, traefik-mk8s-values.yaml, traefik-rtmp-route.yaml | Ingress configuration. |
upgrade-ingress-to-traefik.sh | Moves an older MicroK8s server from NGINX to Traefik ingress. |
upgrade_to_2.0.py, README-upgrade-2.0 | Upgrade tools. See Upgrading SSHepherd. |
image-digests.json | The exact image versions in this release. |
EULA | The license agreement. |
Prepare the MicroK8s host
- Install MicroK8s 1.35 or later, and add your account to the
microk8sgroup:sudo snap install microk8s --classicandsudo usermod -aG microk8s $USERSign out and back in so the group change takes effect. You can then runmicrok8s kubectlwithoutsudo. - If the firewall is enabled, open ports 80, 443 and 1935:
sudo ufw allow from any to any port 80sudo ufw allow from any to any port 443sudo ufw allow from any to any port 1935 - Install curl if it isn’t installed:
sudo apt install -y curl - Copy
shepserver-microk8s-install-<build>.tarto the host and unpack it:tar -xf shepserver-microk8s-install-<build>.tar cdinto the folder that tar created.
For a cluster with more than one node, set up the nodes and Longhorn storage first.
Install with a Let’s Encrypt certificate
Requirements:
- The C3 server has a public IP address.
- Public DNS for your host name points to that address.
- Ports 80 and 443 are reachable from the internet, so Let’s Encrypt can check the server.
If the C3 server is on a private network (LAN or WAN) that the internet can’t reach, you can’t use Let’s Encrypt. Use your own certificate instead.
- Run the install script. It prompts for each value:
./shepserver-microk8s.shOr give the values on the command line:./shepserver-microk8s.sh <hostname> <registry host> <registry user> "<registry password>" letsencrypt <your email>Example:./shepserver-microk8s.sh c3.example.com <registry host> <registry user> "<registry password>" letsencrypt admin@example.comTip: The interactive form keeps the registry password out of your shell history. - Read the license agreement and enter Y to accept it.
- If the server has less than 64 GB free in
/varor less than 32 GB of memory, the script warns you and asks whether to continue. Enter Y to continue or N to stop. - Wait while the script installs the components and waits for the certificate. This can take several minutes.
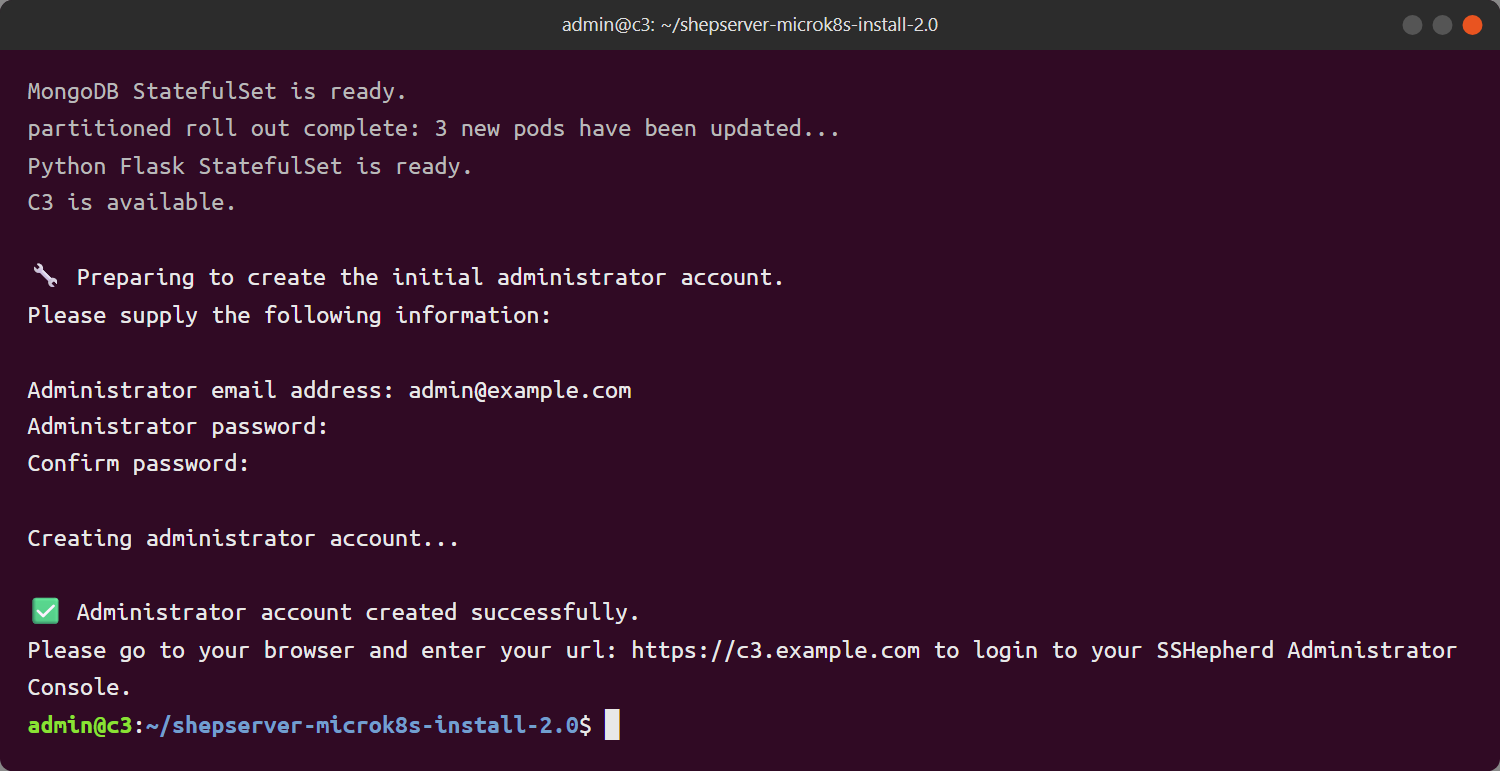
- When prompted, enter the email address and password for the first administrator account.
- The script prints the URL of your C3 server. Open it in a browser and sign in with the administrator account.
Install with your own certificate
- Copy your certificate (
.crt) and unencrypted key (.key) files to the host. If you have a PFX file, convert it first:openssl pkcs12 -in my-cert.pfx -clcerts -nokeys -out my-cert.crtopenssl pkcs12 -in my-cert.pfx -nocerts -out my-cert.keyopenssl rsa -in my-cert.key -out my-cert-unencrypted.key - Run the install script and answer the prompts, choosing
certas the certificate type:./shepserver-microk8s.shOr give the values on the command line:./shepserver-microk8s.sh <hostname> <registry host> <registry user> "<registry password>" cert <crt file> <unencrypted key file> - Accept the license agreement, answer any resource warnings, and create the first administrator, as described above.
Important: If your certificate doesn’t match the host name, or your endpoints don’t trust it, you can add --ignore-ssl-errors to shepagent and shepctl commands. Use this option only in evaluation and test environments, never in production.
Check the installation
Open https://<hostname>/healthz/ready in a browser or with curl. It returns HTTP 200 when the server is ready:
curl -s -o /dev/null -w "%{http_code}\n" https://c3.example.com/healthz/readyTo see the C3 server’s pods:
microk8s kubectl -n sshepherd-<label> get podswhere <label> is the first part of your host name.
Installing on Azure AKS
Azure AKS is Microsoft Azure’s managed Kubernetes service. The AKS bundle, shepserver-azure-install-<build>.tar, contains shepserver-aks.sh, README-aks and the same YAML, recording and upgrade files as the MicroK8s bundle, with NGINX ingress patches instead of the Traefik files.
You need:
- A Linux host with Bash, curl, OpenSSL,
kubectland Helm 3 (installed from Helm’s own packages, not snap). - An AKS cluster that you have already created, with enough CPU, memory, disk and public IP quota.
- Container registry credentials from FullArmor.
The script installs into the cluster you select; it doesn’t create the cluster.
- Connect
kubectlto your cluster:az aks get-credentials -g <resource group> -n <cluster name>kubectl get nodes - Unpack the bundle and run the install script. It prompts for each value:
tar -xf shepserver-azure-install-<build>.tarandcdinto the folder tar created. Then./shepserver-aks.shOr give the values on the command line:
With Let’s Encrypt certificate:
./shepserver-aks.sh <hostname> <registry host> <registry user> "<registry password>" letsencrypt <your email>
With your own certificate:./shepserver-aks.sh <hostname> <registry host> <registry user> "<registry password>" cert <crt file> <unencrypted key file> - Accept the license agreement.
- The script prints the server’s public IP address as soon as Azure assigns it. Create a DNS A record that points your host name to that address. Don’t add an AAAA record unless IPv6 is also routed.
- Make sure ports 80 and 443 reach the address (80 is needed for Let’s Encrypt), and that Windows agents can reach TCP 1935 for RDP recording.
- The script waits for the certificate and checks that the server presents it correctly. Each wait has a time limit of 900 seconds by default; set
INSTALL_TIMEOUT_SECONDSto change it. - When the script finishes, run the
create-first-user.shcommand it prints, and create the first administrator.
Each C3 server on an AKS cluster gets its own NGINX ingress controller, MongoDB, recordings volume and public IP address, in its own namespace. The recording service is shared, in sshepherd-ingress-rtmp.
If the script fails, it leaves the partly created resources so you can see what went wrong. Fix the problem, then contact FullArmor support. Don’t delete a namespace that contains data just to try again. After a DNS problem, cert-manager keeps trying to get the certificate; to check it, run:
kubectl -n sshepherd-<label> get certificate,issuer,order,challengeAfter installation
- Apply your license.
- Configure mail and other settings.
- Optionally, connect an identity provider.
- Install Agents on the hosts you want to protect.
- Create users and groups.