
SSHepherd Documentation
Protecting Telnet
Overview
Telnet is notoriously vulnerable to cyber attacks since it lacks encryption methods compared to more modern protocols like SSH. Below are the steps to secure Telnet using SSHepherd® so that you can close the open listening port and still allow access to telnet to authorized users.
Prereqs
- SSHepherd® Agent installed on your telnet Host
- SSHepherd® Control App/CLI installed on a client machine
- Your user account and the telnet Host are in the same SSHepherd® Group
Configuring the SSHepherd® Agent for Telnet
- Configure the Telnet Server to listen on localhost. In this example, we have ours listening on localhost port 23.
- Configure the Agent to connect telnet over a SSHepherd® tunnel.
- Edit the agent.conf file to add a whitelist entry. This will whitelist the application and port to run through SSHepherd®, allowing you to close your Telnet port and remove the attack surface.
sudo nano -w /etc/SSHepherd/agent.conf
- In your agent.conf file, add ,”whitelist”:[23], as shown in the example below.
{“id”: “123qwe456rty789asd”, “url”: “https://your.sshepherd.server”, “loglevel”:”ERROR”,”whitelist”:[23]}
- Save and Exit the agent.conf file.
- Restart the shepagent.service.
sudo systemctl restart shepagent
Using the SSHepherd® Client CLI to Telnet to your server
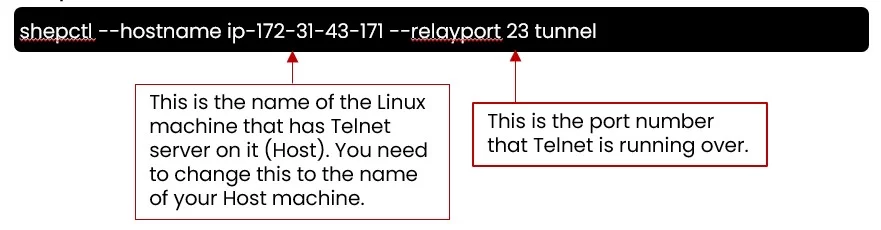
- On your machine with the SSHepherd® Client installed, open a terminal or command prompt and create the SSHepherd® tunnel.
shepctl --hostname ip-172-31-43-171 --relayport 23 tunnel
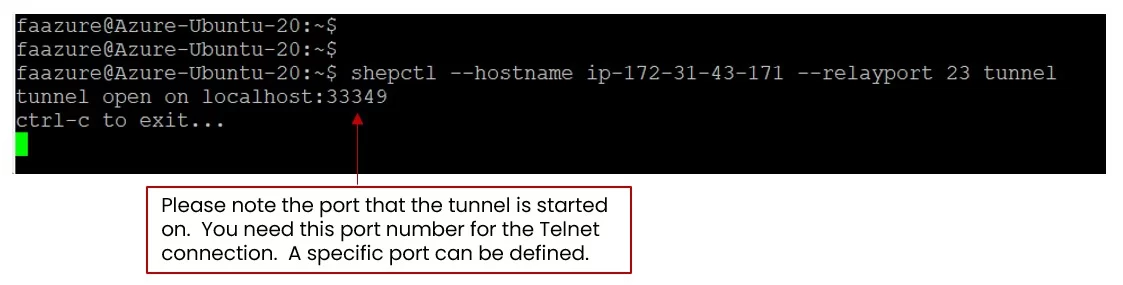
- Once your tunnel is established, open a 2nd terminal or command prompt for your telnet connection through SSHepherd®.
- Telnet to localhost using the port number from step 1.
telnet 127.0.0.1 33349