
Configure SSHepherd® to use a 3rd-Party Identity Provider
SSHepherd supports the following 3rd party Identity Provider types:
- SAML
- OIDC
- Active Directory
SSHepherd® also supports utilizing the SCIM protocol with either SAML or OIDC to provisioning users, groups and user group memberships.
Summary of Steps Necessary to Complete the Setup
- Install the SSHepherd® C3 server using it’s internal identity provider (including creating the initial local administrative account)
- If using SAML or OIDC, log in to your Identity Provider and configure the SSHepherd® application (and optionally configure SCIM)
- Log in to the SSHepherd® C3 server, select the appropriate 3rd party provider tab, and enter the configuration details to complete the integration
- Grant Admin access to the C3 server once the accounts have been provisioned.
Step 1: Install the SSHepherd® C3 server per the documentation
The SSHepherd® C3 server installation guide can be found here. Once you have installed the SSHepherd® C3 server and created the initial local administrator account, continue to Step 2.
Step 2: Configure the SAML or OIDC Identity Provider
IMPORTANT: See the Appendices of this document for specific instructions for Microsoft Entra.
- Create the Application for SSHepherd® in the identity provider’s console.
- If required by the identity provider, assign/grant users and/or groups permission to use the application.
- Configure the authentication settings in the identity provider application using the information provided below.
SAML Authentication Settings
- Entity ID: https://<yourSSHepherdC3Server>/saml/metadata
- Single Signon (SSO) URL: https://<yourSSHepherdC3Server>/saml/acs
- Name ID Format: EmailAddress (recommended)
- Logout URL: https://<yourSSHepherdC3Server>/saml/sls
Make a note of the following information from your Identity Provider. This is needed to configure the SAML settings in the SSHepherd® Admin Console and complete the integration in Step 3:
- Entity ID
- Login URL
- Logout URL
- Certificate (base64 format)
OIDC Authentication Settings
- Redirect URI: https://<yourSSHepherdC3Server>/oidc/cb
- Set claim type to token
Make a note of the following information from your Identity Provider. This is needed to configure the OIDC settings in the SSHepherd® Admin Console and complete the integration in Step 3:
- Provider URL
- Client ID
- Client Secret
Step 3: Configure SSHepherd® to use 3rd Party Authentication
- Sign in to the SSHepherd Admin Console (https://<yourSSHepherdC3Server>) using the local admin account created during the SSHepherd® C3 server installation process.
- Click on the “Settings” tab.
- Select the tab for the authentication mode you want to use and enter the configuration settings you noted in Step 2.
- Select the configured authentication mode in the “Active Authentication Mode” dropdown.
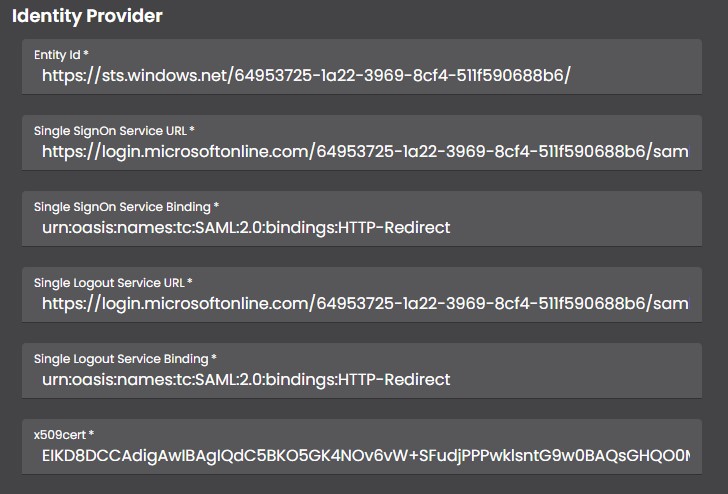
SAML Authentication Settings
- Entity Id: Specify the entity id provided by the identity provider.
- Single SignOn Service URL: The login URL provided by the identity provider.
- Single Logout Service URL: The logout URL provided by the identity provider.
- x509cert: The base64 encoded certificate provided by the identity provider.
- Technical and Support Contact details: Name and Email are required for both.
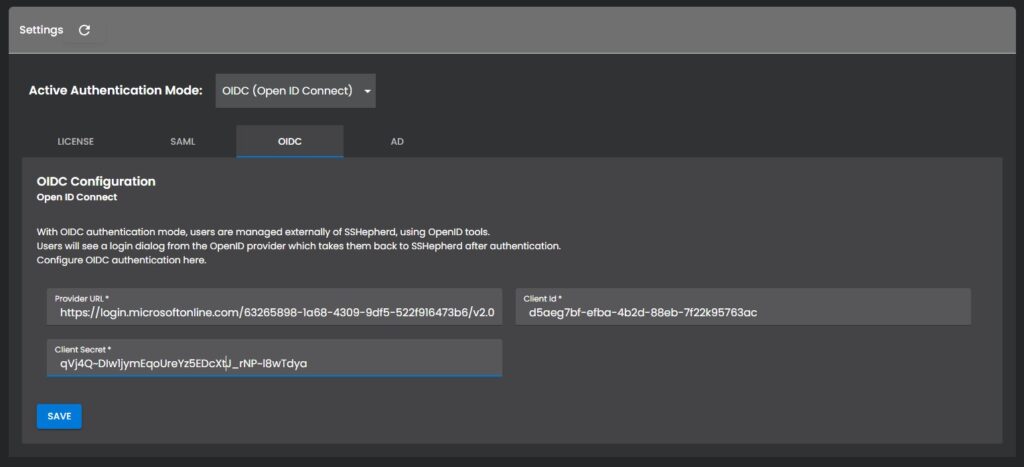
OIDC Authentication Settings
- Provider URL: The URL provided by the identity provider.
- Client Id: The client id provided by the identity provider.
- Client Secret: The client secret provided by the identity provider.
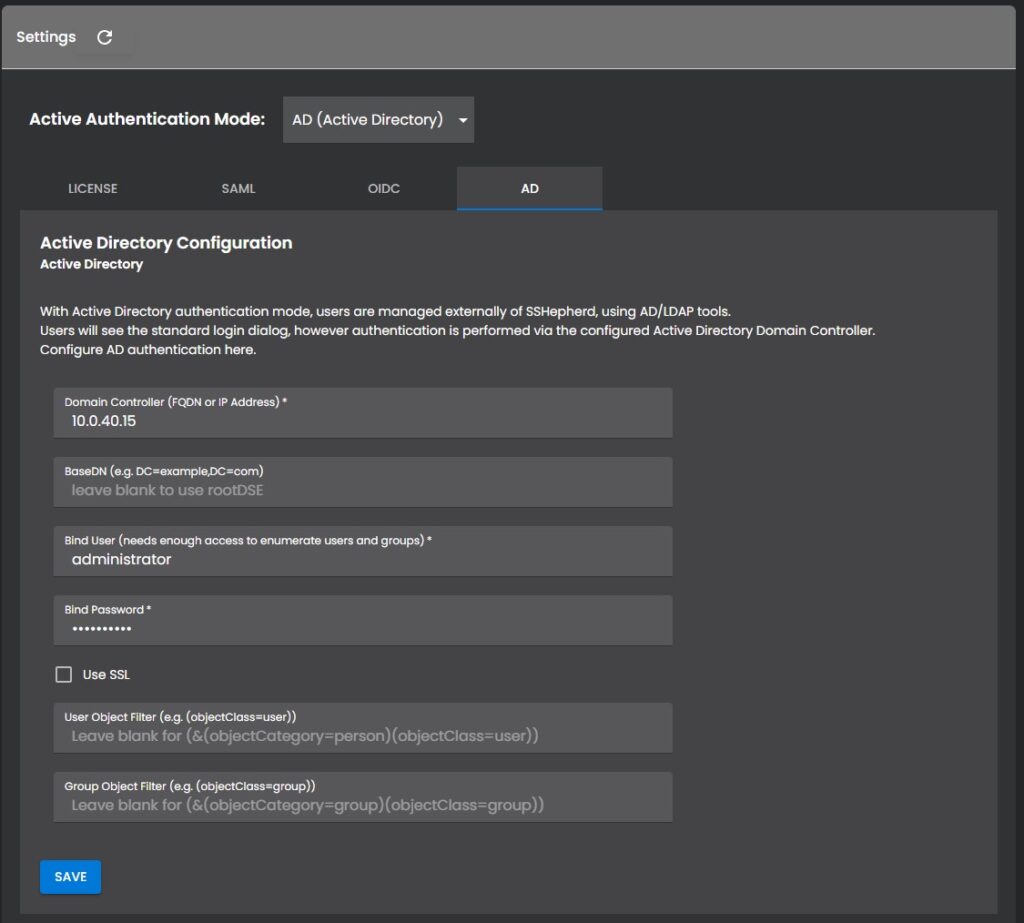
Active Directory Authentication Settings
- Domain Controller: Either the FQDN or IP address of your domain controller.
- Bind User: Domain user that has enough access to enumerate users and groups.
- Bind Password: Password for the Bind User.
Step 4: Assign “Admin” role to account(s)
Allow time for the initial provisioning cycle to complete (if using AD, the C3 will do this itself, if using SAML/OIDC you will need to utilize SCIM provisioning, see below). If using SCIM provisioning, you can check the provisioning status in the Identity Provider’s portal.
Once the initial provisioning cycle is complete, assign the Admin role to any of your newly provisioned user accounts.
- In the SSHepherd C3 Admin Console, select the Roles tab.
- Select the “admin” role.
- Click the ‘Include users’ button in the bottom pane, and select the user account(s) from the list of provisioned accounts to include in the admin role.
- Click the ‘Include’ button to apply.
IMPORTANT: If you find you are unable to login after configuring SSHepherd to use your 3rd party identity provider, add /#/signin?auth=standard to the end of your SSHepherd C3 server URL. This will allow you to bypass the configured authentication and login to the C3 server directly, using your local SSHepherd administrator account.
Example:
https://<yourSSHepherdC3Server>/#/signin?auth=standard
Optional: Configure SCIM Provisioning
To configure automatic provisioning, you will need to configure settings in the identity provider’s provisioning settings:
Scim Endpoint: https://<yourSSHepherdC3Server>/scim/v2/
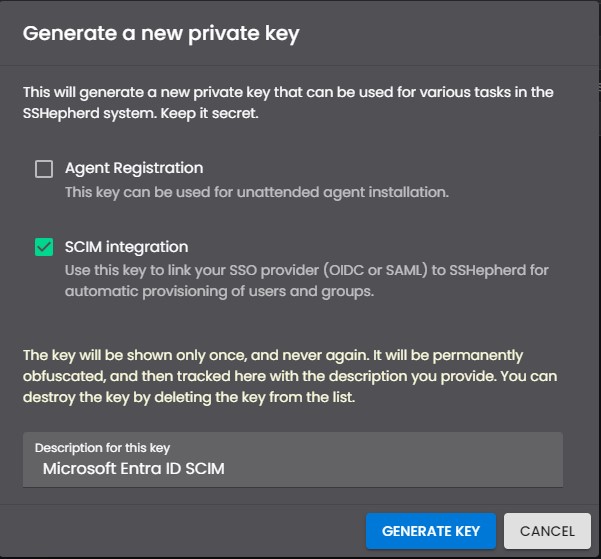
Authentication/Secret Token: You will create this key in the SSHepherd Web Console.
- Login to the SSHepherd C3 Admin Console
- Click the Keys tab
- Click the “+” button.
- Select the “SCIM integration” box, and type a description for the key.
- Click “Generate Key”.
- Copy all the green text (which is your key) and save it someplace safe. The key cannot be reviewed or recovered. If lost, you must create a new key.
Appendix A: Configuring SAML Authentication with Microsoft ENTRA
Create and configure an ENTRA Enterprise Application for SSHepherd®.
- In the ENTRA console, Enterprise Applications, select “Create a new Application”
- Give the application a name, and select “Integrate any other application you don’t find in the gallery (Non-gallery)”.
- Click Create.
- In the ENTRA console, Assign Users and Groups to the Enterprise Application.
- Configure the Enterprise Application to use SAML authentication
- In the Entra Enterprise Application Settings, go to Single Sign On, and Select “SAML”.
- Identifier: https://<yourSSHepherdC3Server>/saml/metadata/
- Reply URL: https://<yourSSHepherdC3Server>/saml/acs
- Sign on URL: https://<yourSSHepherdC3Server>/saml/acs
- Relay State: <leave blank>
- Logout Url: https://<yourSSHepherdC3Server>/saml/sls
- Under SAML Certificates, Download the Certificate (Base64)
- Under “Set up ….”, capture the Login URL, Microsoft Entra Identifier and Logout URL fields (these will go into the Single SignOn Service URL, Single Logout Service URL and x509cert fields respectively in the C3 Web UI).
Set up SCIM provisioning
- In the SSHepherd Admin Console, create a SCIM authentication token (see above)
- In the Entra console, go to the Enterprise Application’s Provisioning tab. Select Provisioning Mode: “Automatic”.
- Under Admin Credentials/Tenant URL, specify the SCIM endpoint:
https://<yourSSHepherdC3Server>/scim/v2/ - For the Admin Credentials/Secret Token, Paste the Scim Auth Token from Step 1.
- Click “Save Changes”.
- Click “Start Provisioning”.
Appendix B: Configuring OIDC Authentication with Microsoft Entra
Create and configure an ENTRA Enterprise Application for SSHepherd®
- In the ENTRA console, Enterprise Applications, select “Create a new Application”
- Give the application a name, and select “Integrate any other application you don’t find in the gallery (Non-gallery)”.
- Click Create.
- In the ENTRA console, Assign Users and Groups to the Enterprise Application.
- In the ENTRA console, go to Applications/App Registrations, and select the Application.
- Under Authentication, select “Add a Platform”, and add the “Web” platform.
- Set “Redirect URI” to https://<yourSSHepherdC3Server>/oidc/cb
- Under Certificates & Secrets, select “New client secret”, and add a new secret (make sure the save the Secret ID and value, you use these in the C3 where Secret ID = Client ID and value = Client Secret).
- Select “Endpoints” at the top of the page, and select the URL under “OpenID Connect metadata document” and use this in the SSHepherd Admin Console in the Provider URL field.
Set up SCIM provisioning
- In the SSHepherd Admin Console, create a SCIM authentication token (see above)
- In the Entra console, go to the Enterprise Application’s Provisioning tab.
- Select Provisioning Mode: “Automatic”.
- Under Admin Credentials/Tenant URL, specify the SCIM endpoint:
- https://<yourSSHepherdC3Server>/scim/v2/
- For the Admin Credentials/Secret Token, Paste the SCIM authentication token from step 1.
- Click “Save Changes”
- Click “Start Provisioning”