Protecting SFTP Server
Overview
In addition to RDP and SSH, SSHepherd® can also protect your TCP/IP applications. It does this by running the application through localhost and connecting to it from the Control App or shepctl CLI.
Below are the steps to harden your SFTP Server using SSHepherd® so that you can close the open listening ports and only allow access to the server to authorized users. SSH File Transfer Protocol is used by many organizations to transfer and manage files over the network.
Configuring SFTP and SSHepherd®
Pre-flight Checklist
- SSHepherd® Agent installed on your SFTP Server
- SSHepherd® Control App/CLI installed on a client machine
- Your user account and the SFTP Server Host are in the same SSHepherd® Group
Configuring the SSHepherd Agent for SFTP
- Configure the Agent to allow SFTP over a SSHepherd® tunnel. This will whitelist the application and port to run through SSHepherd®, allowing you to close your SFTP port, removing the attack surface.
Method 1: Run the add-whitelist command on the shepagent Host. After running the command, you should see confirmation that the port was added to the whitelist, and all whitelisted ports will be displayed. Once you have finished editing the whitelist, you must restart the shepagent service before the changes will be effective.
Linux:
sudo shepagent --port 22 add-whitelist
Windows Administrator Command Prompt:
shepagent --port 22 add-whitelist
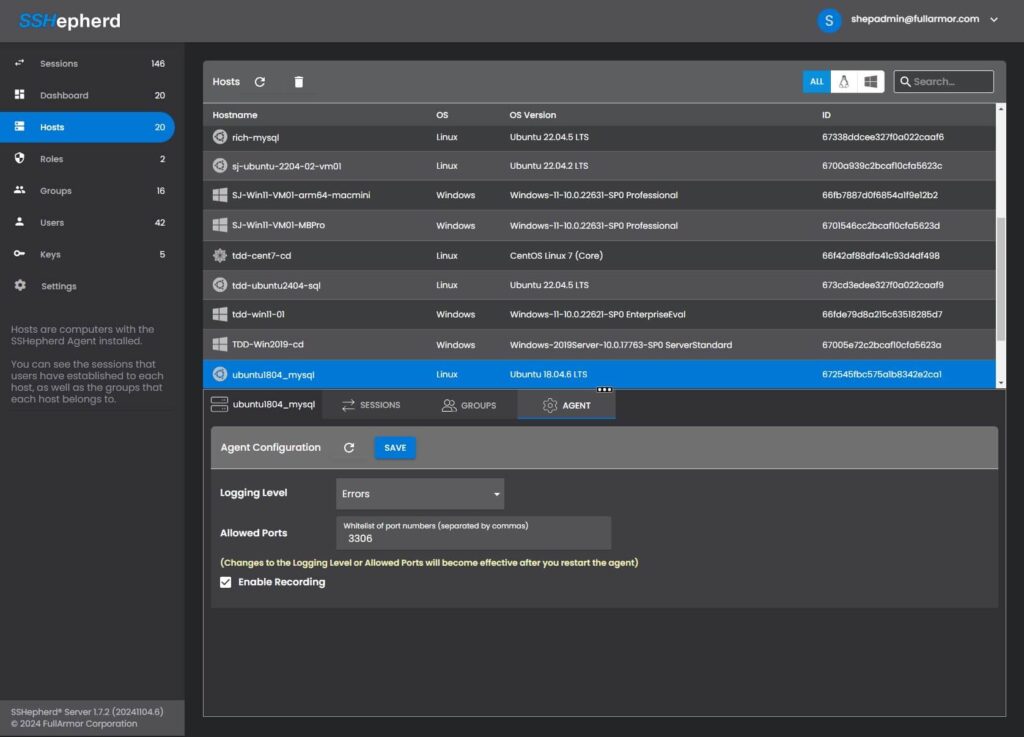
Method 2: Edit the Agent Configuration settings in the Admin Console

- Restart the shepagent.service. This ensures the agent configuration changes are applied.
sudo systemctl restart shepagent
Creating a secure tunnel using the SSHepherd® Control CLI
From your computer with the Control app/shepctl CLI installed, run the following command:
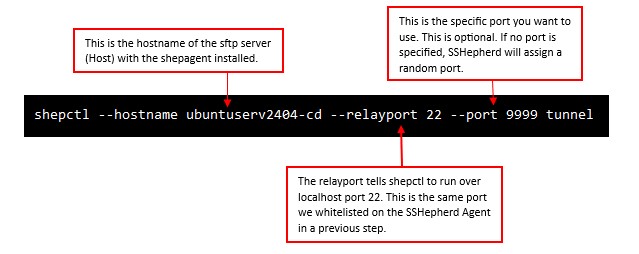
shepctl --hostname your.agent.host --relayport 22 --port 9999 tunnel

You will see that a tunnel has been opened on localhost and a random port has been assigned.

By adding the –port option to the tunnel command, you can assign a specific port.
shepctl --hostname your.agent.host --relayport 22 --port 9999 tunnel

You will see that a tunnel has been opened on localhost and the port you specified has been assigned.

Creating a secure tunnel using the SSHepherd® Control App
- Launch the SSHepherd® Control App.
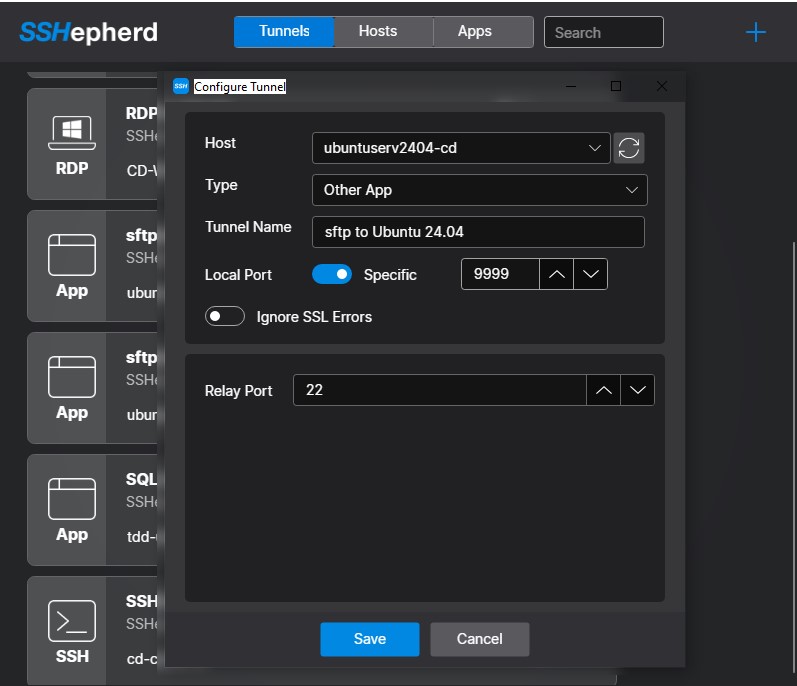
- Click the ‘+’ icon to bring up the ‘Configure Tunnel’ window.
- Select a Host. This field contains a list of all Hosts you have been granted access to.
- Select the Type. This field is the connection type for the session. Choose Other App from the list.
- Tunnel Name. This field allows you to give the tunnel a descriptive name.
- Local Port. By default, this option is set to ‘Automatic’ and will select a random port for you. The other option allows you to manually set a port for this tunnel.
- Relay Port. This field is for the port your application is configured to use. It is also the port that you have whitelisted in the SSHepherd® agent configuration file.
- Save the Tunnel.
- Click the toggle switch for the tunnel you just created to establish the SSHepherd® tunnel.
- You now have a secure tunnel open on localhost port 9999.
Using the sftp client of your choice, you can now establish a connection to your sftp server using localhost:<port>. ex. sftp -p 9999 ubuntuserv2404-cd

