
API Keys
Applies to SSHepherd 2.0
Overview
API keys let tools and scripts work with your C3 server without a user name and password. Each key has one or more types, which decide what it can be used for.
| Key type | shepctl name | Used for |
|---|---|---|
| Agent Registration | api_agent | Registering Agents, including unattended installs. See Installing the Agent. |
| SCIM Integration | api_scim | Letting your identity provider create users and groups through SCIM. See Configuring a Third-Party Identity Provider. |
| Full Isolation | api_isolate_full | Putting an agent into Fully Isolated mode from a script or security tool. |
| Admin Isolation | api_isolate_admin | Putting an agent into Isolated with Admin Access mode from a script or security tool. |
See Agent Isolation for what the isolation modes do.
A key is valid until you delete it. Treat every key like a password:
- Give each key one type, for one purpose, and describe that purpose.
- Store keys in a secrets manager, never in scripts, tickets or chat.
- Delete keys you no longer need, and review the Keys page regularly, for example when people leave.
To manage keys you need the create-api-key, list-api-key and remove-api-key permissions. Users with only the built-in user role don’t see the Keys page.
Create a key in the Administrator Console
- Click Keys.
- Click +.
- Tick the key type you need.
- Check that no other type is ticked. The dialog remembers the types ticked for the previous key until you reload the page.
- Enter a description.
- Click Generate Key.
- Copy the key and store it securely. The key is shown only once. Pressing Escape closes the dialog, so copy the key first.
- Click Close.
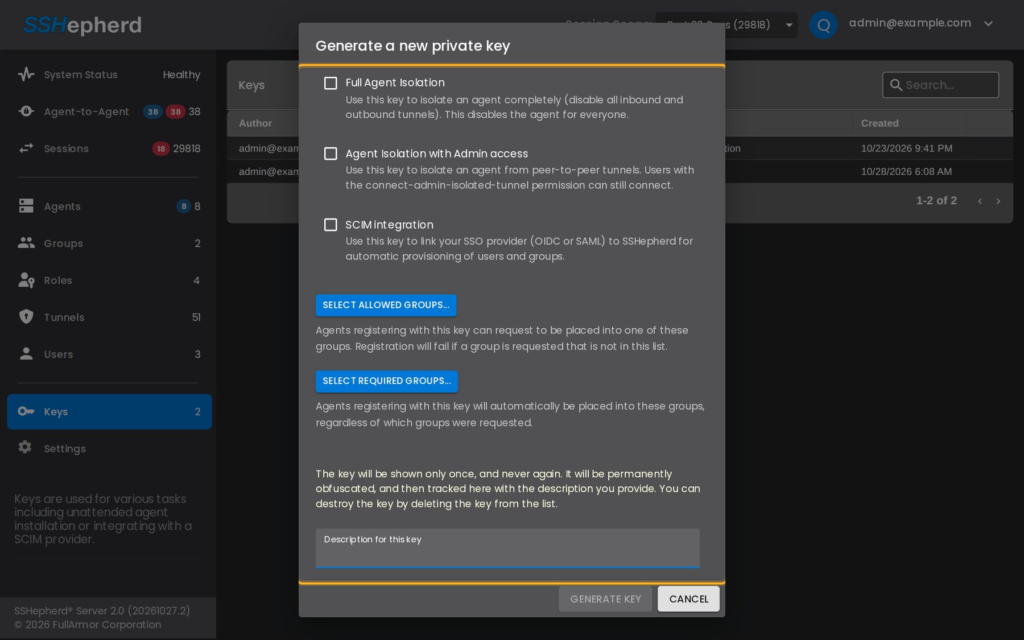
Note: The Allowed Groups and Force Groups fields in the dialog aren’t applied in 2.0. To put an Agent in groups as it registers, use
--groupwithshepagent register.
Create a key with shepctl
shepctl --apikeypermission api_agent --apikeydescription "Web server rollout" create-apikeyTo give one key more than one type, repeat --apikeypermission. shepctl prints the new key once.
List keys
The Keys page lists each key with its author, types, description and creation date. You can sort by any column and search.
With shepctl:
shepctl list-apikeyThe list shows each key’s ID (uuid), types and description, but not the key itself.
Delete a key
Deleting a key stops it working straight away. Anything that still uses it, such as an install script or an identity provider’s SCIM connection, stops working too. Agents already registered with a deleted key keep working.
In the Administrator Console:
- Clear the search box, so the key you want is visible.
- Click the key’s row to select it.
- Click the delete (trash) icon.
- Click Delete Key.
Important: The confirmation doesn’t name the key, and Delete acts on the last row you clicked, even if a search has since hidden it. Always clear the search and click the key you mean just before you delete.
With shepctl, using the ID from shepctl list-apikey:
shepctl --apikeyid <key id> remove-apikeyUse an isolation key
A security tool, such as a SIEM or SOAR platform, can isolate an agent by calling the C3 server with an isolation key. You need the agent’s host ID, from shepctl list-host or shepagent info.
Fully isolate an agent:
curl -X PUT https://your.sshepherd.server/api/apikey/isolate/full/<agent id> -H "Authorization: Bearer <api key>" -H "Content-Type: application/json" -d "{}"Isolate an agent with admin access:
curl -X PUT https://your.sshepherd.server/api/apikey/isolate/admin/<agent id> -H "Authorization: Bearer <api key>" -H "Content-Type: application/json" -d "{}"A successful call returns HTTP 200, and the agent is isolated within seconds. The call returns:
- 401 if the key is missing, malformed, or doesn’t have the type the call needs.
- 404 if the agent ID isn’t found.
- 503 if the isolation was saved but the C3 server couldn’t confirm that running sessions were ended. Check the agent on the Sessions page.
To return an agent to Normal, set its Availability on the agent’s Settings tab.