
Installing the SSHepherd® Agent
Applies to SSHepherd 2.0
Overview
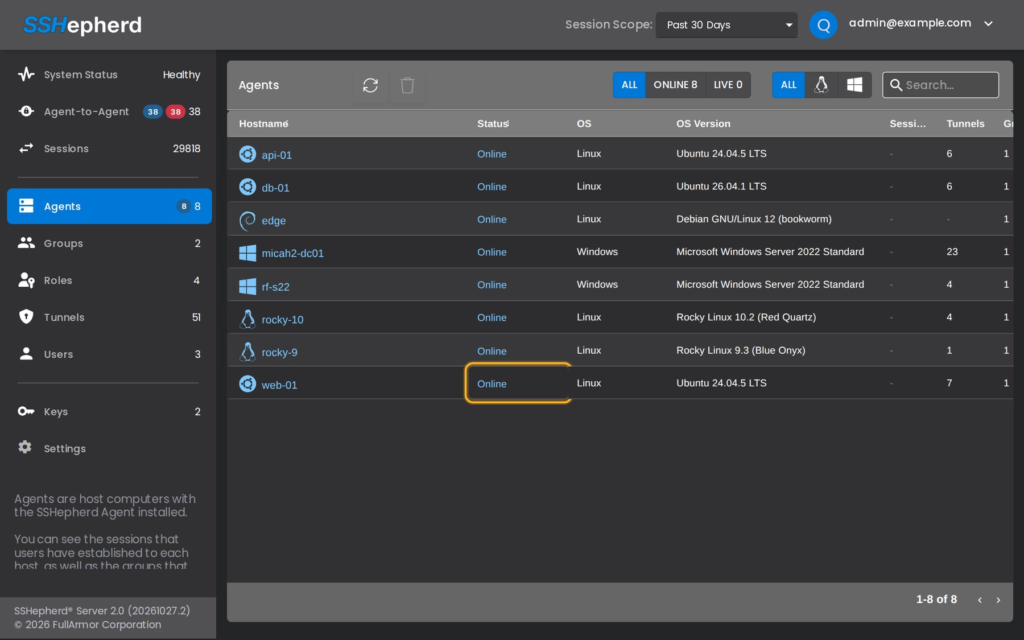
Install the SSHepherd® Agent on each Linux or Windows host you want to protect, then register the Agent with your C3 server. After registration, users can reach the host through the Control App or shepctl, and you can close the host’s RDP, SSH and application ports to the network.
After you install and register the Agent, you can:
- Open an SSH session or an RDP session to the host.
- Set the Agent’s allowed ports, recording and availability on the Managing Agents page.
- Give users access to the host by adding the Agent to a group. See Creating Users and Groups.
System Requirements
The SSHepherd® Agent runs on these operating systems:
- Windows 10 and Windows 11, Professional or Enterprise
- Windows Server 2016 +
- Ubuntu 16.04 +
- Debian 11 +
- Red Hat Enterprise Linux 7.9 +
The Windows Agent is available for x64 and AArch64. The Linux Agent packages are for x64.
Notes:
- Windows Server 2016 doesn’t include OpenSSH, so SSH sessions to a Server 2016 host aren’t available. RDP sessions work normally.
- Linux hosts need
socat,lxcand OpenSSH. The package manager installs them from your distribution’s repositories. On Red Hat Enterprise Linux, make suresocatis available from an enabled repository before you install the Agent.
Ways to register the Agent
When you register an Agent, you prove to the C3 server that you’re allowed to add hosts. You can register with:
- An SSHepherd® administrator account. You enter the user name and password when prompted.
- An Active Directory administrator account.
- SSO (OIDC or SAML). You confirm a code in your browser and sign in with your identity provider.
- An API key. No user name or password is needed. Use an API key for unattended installs, for scripts, and to add the Agent to groups during registration.
Run every registration command as an administrator: in an elevated Command Prompt on Windows, or with sudo on Linux.
Installing the SSHepherd® Agent on Windows
Basic install and registration (administrator account)
- Download and run the Agent installer,
shepagent-2.0.<version>_x86_64.msi. - When the installer finishes, open a Command Prompt as administrator.
- Run this command to register the host with your C3 server. Replace
https://your.sshepherd.serverwith the URL of your C3 server.shepagent --url https://your.sshepherd.server register - When prompted, enter the user name and password of an SSHepherd® administrator.
- The host is registered and appears on the Agents page of the Administrator Console.
The MSI adds C:\Program Files\FullArmor\SSHepherd\Agent to the system PATH, so shepagent works from any new Command Prompt.
Basic install and registration (SSO: OIDC, SAML)
If your C3 server is set up for SSO, you can register Agents in one of two ways:
- Option 1: sign in through your identity provider. This happens automatically when you don’t use
--apikey. - Option 2: use an API key, as described below in Registering with an API key.
To register with SSO:
- Download and run the Agent installer.
- Open a Command Prompt as administrator and run:
shepagent --url https://your.sshepherd.server register - Instead of a user name and password prompt, you’ll see a URL and a validation code. Open the URL in a web browser and enter the code. The code expires after 10 minutes.
- Your browser redirects you to your identity provider. When you’ve signed in, the Agent completes registration.
If registration fails while installing OpenSSH
When you register a Windows host, the Agent installs the Windows OpenSSH Server so that users can open SSH sessions. On some systems, such as Windows Server 2019 without the OpenSSH capability, or some Windows 10 builds, this step fails with a DISM error and registration stops.
To register these hosts:
- In PowerShell as administrator, install OpenSSH Server yourself:
Add-WindowsCapability -Online -Name OpenSSH.Server~~~~0.0.1.0 - Register the Agent with
--nowinssh, which tells it not to install OpenSSH:shepagent --url https://your.sshepherd.server --nowinssh register
You can also use --nowinssh on any host where you don’t want SSH sessions at all, for example a host used only for RDP.
Unattended Windows install
The Agent MSI accepts the server URL, an API key and groups as properties. This lets you install and register in one step, with no prompts:
msiexec /passive /i shepagent-2.0.<version>_x86_64.msi SERVERURL="https://your.sshepherd.server" APIKEY="<api key>" GROUPS="<group names>"Example:
msiexec /passive /i shepagent-2.0.<version>_x86_64.msi SERVERURL="https://your.sshepherd.server" APIKEY="<api key>" GROUPS="Web Servers"Create the API key first. See Create an Agent Registration key.
Note: The API key appears in the msiexec command line, so it can be seen in the process list and in any log or deployment tool that records the command. Use a key created only for this rollout and delete it when the rollout is finished.
You may need to refresh the Agents page in the Administrator Console before the new host appears.
Installing the SSHepherd® Agent on Linux
Install on Debian/Ubuntu
Install the Agent from the SSHepherd® package repository, or from the .deb file in the release you downloaded.
From the repository. Do this once on each Linux machine where you want to use shepagent or shepctl. Replace <repository user> and <repository password> with your repository credentials.
sudo apt update && sudo apt install -y wget apt-transport-https
sudo mkdir -p /etc/apt/keyrings
wget -O- "https://<repository user>:<repository password>@repo.sshepherd.io/fullarmor.gpg.key" | gpg --dearmor | sudo tee /etc/apt/keyrings/fullarmor.gpg > /dev/null
echo "deb [signed-by=/etc/apt/keyrings/fullarmor.gpg] https://repo.sshepherd.io/debian buster main" | sudo tee /etc/apt/sources.list.d/fullarmor.list
echo "machine repo.sshepherd.io login <repository user> password <repository password>" | sudo tee /etc/apt/auth.conf.d/fullarmor.conf
sudo apt update
sudo apt install -y shepagent
From a downloaded package. Copy the .deb file to the host and run:
sudo apt update
sudo apt install -y ./shepagent-2.0.<version>_x86_64.deb
apt installs the Agent and its dependencies.
Install on Red Hat Enterprise Linux
From the repository. Do this once on each Linux machine where you want to use shepagent or shepctl.
sudo yum install -y wget
wget -O - "https://<repository user>:<repository password>@repo.sshepherd.io/el$(rpm -E '%{?rhel}')/sshepherd.repo" | sudo tee /etc/yum.repos.d/sshepherd.repo
echo "username=<repository user>" | sudo tee -a /etc/yum.repos.d/sshepherd.repo
echo "password=<repository password>" | sudo tee -a /etc/yum.repos.d/sshepherd.repo
sudo yum install -y shepagent
From a downloaded package. The release contains a separate RPM for each RHEL version: el7, el8, el9 and el10. Copy the one that matches your host and install it with yum (RHEL 7) or dnf (RHEL 8 and later). For example, on RHEL 9:
sudo dnf install -y ./shepagent-2.0.<version>-1.el9.x86_64.rpmRegister the Linux Agent
With an SSHepherd® or Active Directory administrator account:
- Run:
sudo shepagent --url https://your.sshepherd.server register - When prompted, enter the administrator’s user name and password.
- The host is registered and appears on the Agents page of the Administrator Console.
With SSO (OIDC, SAML): run the same command. Instead of a password prompt, you’ll see a URL and a code. Open the URL in a browser, enter the code within 10 minutes, and sign in with your identity provider.
With an API key: see the next section.
Registering with an API key
An API key lets you register Agents without a user name or password, and add them to groups as they register. You can use one key for many Agents.
Create an Agent Registration key
- Sign in to the Administrator Console as an administrator.
- Click Keys.
- Click +.
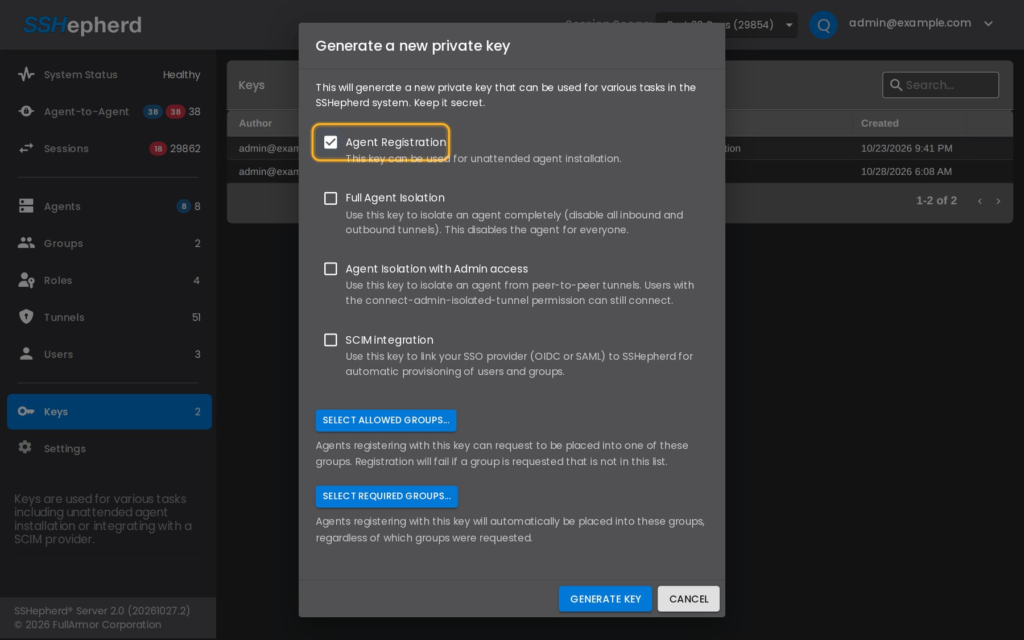
- Tick Agent Registration and enter a description, for example “Web server rollout, November”.
- Check that Agent Registration is the only key type ticked. The dialog remembers the ticks from the last key you created.
- Click Generate Key.
- Copy the key and store it somewhere secure. The key is shown only once. Pressing Escape also closes the dialog, so copy the key first.
- Click Close.
You can also create a key with shepctl:
shepctl --apikeypermission api_agent --apikeydescription "Web server rollout" create-apikeyA key stays valid until you delete it. To revoke it, select it on the Keys page and click the delete icon. Agents that are already registered keep working after you delete the key. For more about key types, see API Keys.
Note: The Allowed Groups and Force Groups fields in the key dialog aren’t applied in 2.0. To add an Agent to groups, use
--groupwhen you register it, or add it to groups afterwards.
Register an Agent with the API key
Install the Agent as described above, then add --apikey to the register command.
Windows (Command Prompt as administrator):
shepagent --url https://your.sshepherd.server --apikey <api key> registerLinux:
sudo shepagent --url https://your.sshepherd.server --apikey <api key> registerNote: While
registerruns, the API key is part of the command line. Other users on the host can see it in the process list, and it’s saved in your shell history. Register Agents from a session only administrators can use, clear the command from your history afterwards, and delete the key when you no longer need it.
Add the Agent to groups during registration
Add --group with the name of the group. To add the Agent to more than one group, repeat --group for each group. Put quotes around names that contain spaces.
Single group:
sudo shepagent --url https://your.sshepherd.server --apikey <api key> --group "Web Servers" registerSeveral groups:
sudo shepagent --url https://your.sshepherd.server --apikey <api key> --group "Web Servers" --group "Linux Hosts" registerThe groups must already exist. See Creating Users and Groups.
Check the Agent
After registration, check that the Agent is connected:
- In the Administrator Console, click Agents. The new host is listed as online, with its operating system and Agent version.
- On the host, run
shepagent infoas administrator (Windows) or withsudo(Linux). It shows the host ID, the C3 server URL and whether the Agent is registered.sudo shepagent info - To see the Agent version, run
shepagent version.
You can check the Agent service like this:
- Windows: in Services, check that the SSHepherd Agent service is running. The Agent log is
C:\ProgramData\sshepherd\shepagent.log; at the default Logging Level (Errors) the Agent doesn’t write this file, so raise the level on the agent’s Settings tab if you need it. Service errors also appear in the Windows Application event log. - Linux: run
systemctl status shepagent. To read the log, runsudo journalctl -u shepagent.
Reinstalling or upgrading the Agent
- To upgrade, install the new MSI,
.debor.rpmover the existing Agent. The host keeps its host ID and its settings, and you don’t need to register it again. - After you upgrade the C3 server, restart the Agent service on each host.
- Uninstalling the Windows Agent leaves its configuration in
C:\ProgramData\sshepherd. If you reinstall and register again, the host keeps its host ID. - If registration after a reinstall fails with
PermissionErrorandlast_peer, the old configuration is blocking it.
Important: Don’t remove a host from the C3 server just to reinstall its Agent. Removing a host also deletes its sessions, recordings and tunnel definitions. See Managing Agents.